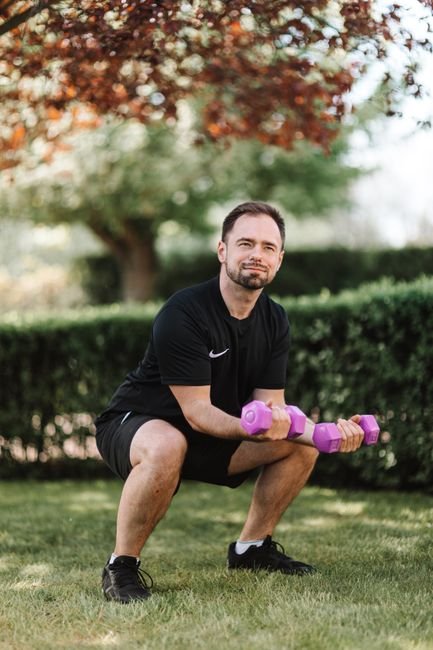
Dumbbell Squat Form Guide
Dumbbell Squat Form: 6-Step Guide (With Common Mistakes)
You do not need a squat rack to build strong legs. A pair of dumbbells and a few square feet of floor space will do the job. The dumbbell squat is one of the most practical lower-body exercises for anyone training at home or in a crowded gym. It trains your quads, glutes, hamstrings, and core without the setup time and learning curve of a barbell back squat.
According to the National Strength and Conditioning Association (NSCA), free-weight squat variations produce similar muscle activation to barbell squats when performed through a full range of motion. For busy adults who train in a garage, apartment, or packed commercial gym, dumbbell squats offer a time-efficient way to load the pattern without waiting for equipment.
Here is exactly how to do them right.
>Step 1: Choose Your Grip and Starting Position
>Stand with your feet about shoulder-width apart, toes pointed forward or slightly outward. Hold one dumbbell in each hand at your sides, arms fully extended, palms facing your body. This is the standard farmer’s-hold position.
If your dumbbells are light, this grip works fine. As the weights get heavier, your grip may give out before your legs do. In that case, switch to a front-loaded position: hold both dumbbells at shoulder height, resting lightly against the front of your shoulders with your elbows pointing forward. This front-rack variation also keeps your torso more upright, which can reduce lower-back stress and shift more load to your quads.
Before you squat, retract your shoulder blades and brace your midsection as if someone were about to poke you in the stomach.
Step 2: Brace Your Core
Breathing and bracing are not optional. The American College of Sports Medicine (ACSM) emphasizes that intra-abdominal pressure protects your spine during loaded spinal flexion and extension. Take a deep breath into your belly, not your chest. Hold that pressure as you descend. This 360-degree core tension keeps your lower back from rounding or arching under load.
Think of it as filling a barrel around your entire torso, front to back and side to side. Exhale only after you pass the hardest point of the ascent, or breathe out sharply through a pursed mouth as you stand.
Step 3: Initiate the Descent
Push your hips back and bend your knees simultaneously. Do not drop straight down or send your hips back alone. The squat is a synchronized hip-and-knee break.
Keep your chest up and your gaze fixed on a point a few feet in front of you on the floor. Looking straight ahead or up at the ceiling often causes hyperextension of the cervical spine and throws off your balance. Looking slightly down keeps your neck neutral and your center of mass controlled.
Your heels should stay planted. If you feel your weight shifting to your toes, pause and reset.
Step 4: Track Your Knees Over Your Toes
As you lower yourself, your knees should travel in the same direction your toes point. For most people, this means the knees drift outward slightly as they bend. Let them. The old cue “do not let your knees pass your toes” is outdated and biomechanically flawed. Knee travel over the toes is a normal part of a healthy squat and reduces shear forces on the hip and lower back.
The International Society of Sports Nutrition (ISSN) and other exercise-science bodies recognize that unrestricted knee flexion during squatting distributes load more evenly across the hip, knee, and ankle joints. Forcing your knees behind your toes forces your torso to lean excessively forward and dumps stress onto your lower back.
Step 5: Hit Consistent Depth
Descend until your hip crease drops below the top of your kneecap. This is parallel depth, and it is the standard you should aim for on most reps. Partial squats load the knees heavily without engaging the glutes and hamstrings fully, which reduces the exercise’s value and increases joint stress.
If you cannot reach depth without your heels lifting or your lower back rounding, your limitation is likely ankle mobility or hip flexibility, not strength. Place a small weight plate or a thin book under each heel to elevate them slightly. This reduces the ankle dorsiflexion demand and usually lets you sink deeper with an upright torso.
Stop if you experience joint pain, but do not confuse pain with the mild discomfort of a deep stretch in your hips and adductors.
Step 6: Drive Up With Control
Press through your full foot, not just your heel. Your big toe and the ball of your foot should bear as much load as your heel. Drive upward by extending your hips and knees at the same time. Stand tall at the top and squeeze your glutes, but do not thrust your hips forward aggressively. Lockout should look tall and stable, not exaggerated.
Maintain your braced position through the entire ascent. If your lower back arches or your shoulders fall forward as you stand, the weight is too heavy or your core is not braced hard enough. Drop the load and rebuild from there.
Common Mistakes That Waste Your Time
Rounding your lower back. This is the most dangerous error. Once your spine rounds under load, the stress shifts from your muscles to passive structures like ligaments and discs. Keep your core tight and your ribcage stacked over your pelvis throughout the set.
Squatting on your toes. If your heels lift off the ground, you are shifting torque into your knees and losing power. Fix it by slowing down, practicing bodyweight squats with your heels on plates, or working on ankle mobility before you load the movement.
Holding the dumbbells wrong. Dangling heavy dumbbells from your arms with shrugged shoulders turns a leg exercise into a grip and trap exercise. If your grip limits the load, use the front-rack position or switch to a goblet squat with a single heavier dumbbell held vertically at your chest.
Rushing the eccentric. Bouncing out of the bottom position using momentum strips tension from your muscles and stresses your joints. The lowering phase should take about two to three seconds. Pause for a half-second at the bottom if you tend to rush.
Ignoring your knees. If your knees cave inward as you stand, usually called knee valgus, your glutes are not firing properly and your risk of ACL or MCL strain rises. Consciously push your knees outward against an imaginary resistance band. If they still collapse, drop the weight and add lateral band walks or clamshells to your warm-up.
Setting up on a bad surface. Thick carpet, unstable mats, or sloped driveways throw off your balance and hide depth inconsistencies. Use a firm, flat surface. A piece of plywood over carpet works well for a home setup. Wear flat-soled shoes or train barefoot if your floor allows it.
Programming and Home Setup Tips
Dumbbell squats fit into nearly any program. For strength, work in the 5 to 8 rep range with heavier dumbbells and longer rests. For muscle growth, aim for 8 to 15 reps with controlled tempo and shorter rest periods. For general fitness, try 3 sets of 10 to 12 reps twice a week.
You do not need a full gym to train hard. A pair of adjustable dumbbells, a flat surface, and a mirror or phone video for form checks are enough. Record yourself from the side occasionally. What feels like deep depth often is not. Video does not lie.
If you outgrow your heaviest dumbbells, slow the tempo down, add pauses at the bottom, or switch to Bulgarian split squats, which require less absolute load per leg.
Summary: Your Daily Checklist
- Feet shoulder-width, toes forward or slightly out
- Dumbbells at your sides or front-racked at the shoulders
- Big belly breath and 360-degree core brace
- Hips back and knees out simultaneously
- Knees track over toes without restriction
- Hip crease below knee at the bottom
- Heels down, full-foot pressure on the way up
- Controlled tempo, no bouncing
Master these six steps and you will build stronger legs with less joint stress and no wasted time.
About the author: href=”https://www.apexfito.com/liam-smith-author-founder-of-apexfito/”>Lia m Smith is the founder of Apexfito and writes evidence-based training guides and gear reviews.
Medical & Editorial Review: This article was reviewed by Liam Smith for accuracy and safety. Content is for educational purposes only.
Related reading:
One Comment