The 10 Best Glute Exercises With Resistance Bands for a Stronger Lower Body
Full disclosure: Some links in this article are affiliate links. We may earn a small commission at no extra cost to you if you make a purchase through them. Our recommendations are based on what real users report, not on commission size.
Why Resistance Bands Are Made for Glute Gains
I’ve trained in commercial gyms, in a garage that hit 95 degrees in July, and in a cramped apartment corner with a door anchor. The setup that stayed consistent through all of it? A stack of resistance bands. For glute work specifically, they’re not a compromise — they’re one of the smartest tools at home.
Here’s why. In a glute bridge, the band stretches tighter as you press your hips up. The hardest part of the movement happens at the top, exactly where your glutes fully contract. A barbell can’t do that — gravity keeps the load the same, and parts of the lift get easier as the weight shifts. Bands load the muscle precisely where it needs the challenge.
That constant tension keeps your glutes firing even at the peak of a squeeze. It’s the difference between going through the motions and actually loading the muscle.
Cheap, Compact, and Beginner-Friendly
You can build a solid band collection for twenty to forty dollars. They take up less space than a pair of shoes, weigh almost nothing, and won’t wake anyone up if you train late. No gym membership, no heavy barbell, no commute. Fewer obstacles between you and a workout means you’re more likely to do it.
This workout is designed for beginners and anyone who wants stronger glutes without gym equipment. You won’t need complicated setup or a spotter — just enough floor space to move.
If you’re shopping for your first set, grab something with multiple resistance levels. The WODFitters Resistance Band Set is a reliable starting point, and the Fit Simplify Resistance Loop Bands Set is a lighter, budget-friendly pick for warm-ups and activation. Just choose a band rated for your strength level so it stays flat against your legs and gives clean tension through every rep.
We’ll cover band selection in more detail later. For now, grab a set, clear some floor space, and let’s put your glutes to work.
Pick Your Bands and Set Up Your Space
Choosing the right resistance band setup saves you from a workout where nothing feels stable. I’ve had a thin loop snap mid-squat and a door anchor slide loose during a pull-through, so take the ten minutes to get organized before you start.
Loop Bands vs. Long Bands
Resistance bands fall into two categories, and each one has a different job.
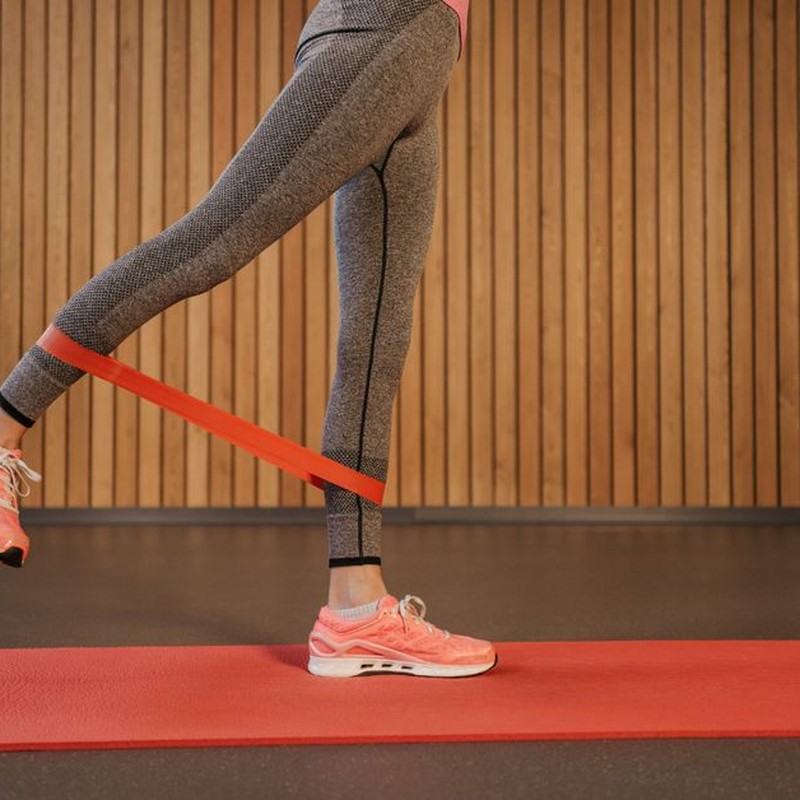
Loop bands are continuous circles of rubber. They stretch around your thighs for lateral band walks, glute bridges, and hip thrusts. They sit flat on the skin and need no handles or clips. The Fit Simplify Resistance Loop Bands Set is a dependable starter pack with five light-to-medium loops that give you room to grow.
Long bands with handles are the tube-style bands with foam handles on each end. You attach them to a door anchor or a couch leg for kickbacks, pull-throughs, and any pulling movement that needs more range. Because they’re longer than loops, they let you stand farther from the anchor and keep tension through a fuller motion. The Whatafit Resistance Bands Set 20-100LB covers both needs in one kit, with loop bands and tube bands with handles, so you can mix lower-body work and upper-body work without buying two sets.
Pick Your Resistance
Choose your band based on the exercise, not just on how strong you feel that day. For warm-ups like lateral band walks, glute bridges, and clamshells, start with a light or medium band. You’re waking up your glutes, not grinding through forced reps. If you need a little more tension, stack two light loops together instead of jumping straight to a heavy band. My own warm-up starts with the lightest Fit Simplify band and switches to the medium one once the glutes feel awake.
Save the heavy loops for the main lower-body movements. That’s where you need enough resistance to challenge your glutes in the 10–15 rep range. The Serious Steel Heavy Resistance Bands Set is built for this. The loops are thicker and wider, so they don’t roll up or bite into your hips the way cheaper thin bands do. If you also want a color-coded loop set that travels well, the WODFitters Resistance Band Set is easy to pack and cheap enough to toss in a gym bag.
Set Up Your Space
You need enough floor to move around and something solid to attach to. For exercises like kickbacks and pull-throughs, use a door anchor or a heavy piece of furniture. I anchor to a door when the space is available and use a sturdy table leg when it’s not. Wrap a towel around any furniture leg so the band doesn’t mark the wood or slip.
Before you start, close the door fully and give the anchor a hard pull. If it slides or creaks, find another anchor point. A setup that fails mid-set messes up your safety and your rhythm.
Keep a yoga mat or exercise mat near the spot where you’ll place your knees and feet. The floor gets uncomfortable quickly, and a mat keeps your focus on your glutes instead of carpet burn.
With your loops sorted and your anchor secure, the only task left is to do the work.
10 Best Glute Exercises With Resistance Bands: Step-by-Step
Resistance bands are underrated for building a stronger lower body. Unlike a barbell, the band gets tighter as it stretches, so your glutes have to work hardest right at the top of the movement—exactly where you want the burn to hit. I’ve put together a lot of home workouts, and bands are still the quickest way to light up my glutes without a rack of plates.
You’ll want a few different resistances so you can keep progressing. The Fit Simplify Resistance Loop Bands Set has five levels and is perfect for bridges, lateral walks, and hip thrusts. For heavier pulls like deadlifts and pull-throughs, the Serious Steel Heavy Resistance Bands Set is worth the extra cash. And if you want one kit with tubes, handles, and a door anchor, the WODFitters Resistance Band Set has everything you need for the whole list below.
One rule before we start: control the lowering phase. Don’t let the band snap you back. And if you feel a sharp pain, especially in your lower back or knees, stop that movement and try a lighter band or skip it entirely. A dull muscle burn is normal; joint pain is not.

1. Banded Glute Bridge
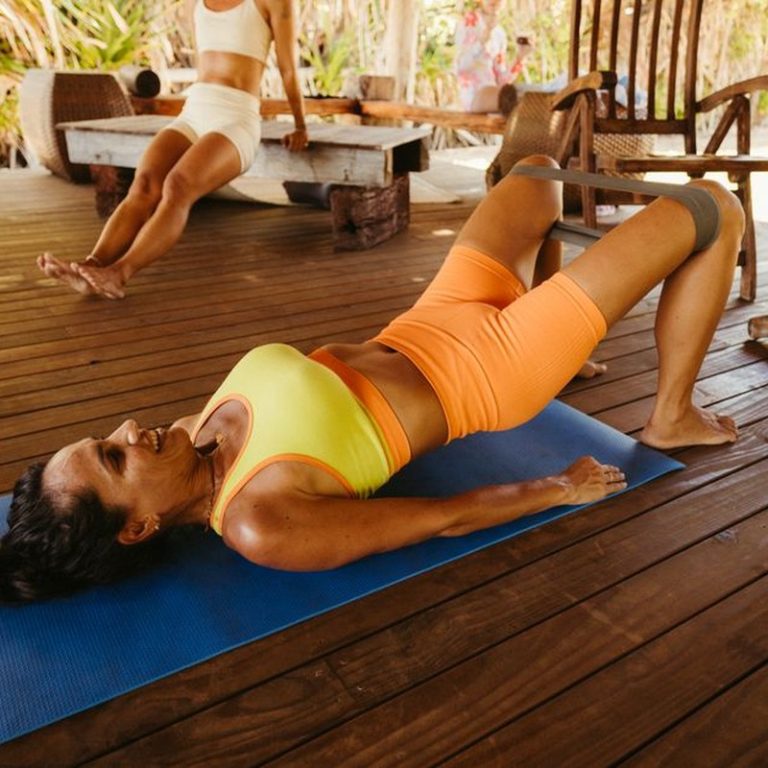
Setup: Lie on your back with your knees bent and feet flat on the floor, hip-width apart. Place a loop band just above your knees.
Move: Plant your heels, then drive your hips up until your shoulders, hips, and knees form a straight line. Squeeze your glutes hard for 2 seconds at the top, then lower with control. Keep your chin tucked and your pelvis in a slight tuck so you don’t overarch your lower back.
Sets and reps: 3 sets of 15. If you feel it in your lower back instead of your glutes, lower the band tension and focus on the squeeze.
2. Banded Hip Thrust
Setup: Sit on the floor with your upper back against a couch, low bench, or sturdy chair. Loop a band around your thighs, just above your knees. To add more resistance, roll the band up toward your hips.
Move: Push through your heels and lift your hips until your torso is parallel to the floor. Squeeze your glutes at the top, tuck your pelvis under slightly, and keep your ribs down. Lower slowly—don’t just drop your hips.
Sets and reps: 3 sets of 12. If your hamstrings cramp, slide your feet a few inches forward and drive through your whole foot.
3. Lateral Band Walk
Setup: Put a loop band around your lower thighs, just above your knees. Stand tall, then sit into a quarter squat with your chest up and your weight over your heels.
Move: Take a slow step to the side with your right foot, then follow with your left, keeping the band stretched the entire time. Never let it go slack. Take 15 steps to the right, then switch and go 15 to the left.
Sets and reps: 3 sets of 15 steps per side. I like doing this first because it wakes up the glute medius right away—your hips feel steadier by the time you hit the heavier moves.
4. Banded Squat
Setup: Use a long resistance band with handles and stand on the center of the band with your feet shoulder-width apart. Bring the handles up to your shoulders so the band stays in place. If you only have mini loop bands, place one just above your knees and keep your feet in place—you don’t need handles for it to work.
Move: Start the squat by sitting your hips back and down, keeping your chest tall. Push your knees out against the band as you descend so they track over your toes. Drive through your whole foot to stand, and squeeze your glutes hard at the top.
Sets and reps: 3 sets of 12. If the band makes you wobble, slow down and think about spreading the floor with your feet.
5. Glute Kickback
Setup: Attach a band to a low anchor point—a door anchor or a heavy couch leg works. Slide your foot through the handle so the band sits around the middle of your foot. Long bands like the TheraBand CLX Resistance Band Set work well here because you can customize the length to your height.
Move: Keep your leg straight and kick it back and slightly up, squeezing your glute at the end. Don’t let your lower back arch. Imagine you’re pushing the wall behind you with your heel while your torso stays perfectly still.
Sets and reps: 3 sets of 12 per leg. Do all the reps on one side before switching.
6. Fire Hydrant
Setup: Get on all fours with your hands under your shoulders and your knees under your hips. Place a loop band around your knees.
Move: Keep your knee bent to 90 degrees and lift it out to the side, like a dog at a fire hydrant. Go as high as you can without rotating your hips or twisting your torso. Pause briefly at the top, then lower with control.
Sets and reps: 3 sets of 12 per side. If you feel your lower back working, drop the range of motion and focus on using your glute to lift the leg.
7. Banded Deadlift
Setup: Stand on the middle of a long band with handles and your feet hip-width apart. Hinge down and grab the handles so the band is taut. Keep your arms straight, your back flat, and your shoulders packed.
Move: Push your hips forward and stand up tall, squeezing your glutes hard at the top. The band pulls down on your shoulders as you rise, so keep your chest tall and your core braced to avoid rounding forward. Lower yourself back into the hinge with control.
Sets and reps: 3 sets of 15. This one sneaks up on you—the last few reps should feel like a real struggle.
8. Standing Abduction
Setup: Loop a band around your ankles and hold a wall, counter, or chair for balance. Stand tall with your hips square to the wall.
Move: Lift your working leg out to the side as high as comfortable without leaning your torso or hiking your hip. Keep your toes pointing forward. Lower slowly and keep tension in the band the entire time.
Sets and reps: 3 sets of 15 per leg. If the band digs into your ankles, fold it over once or wear longer socks.
9. Donkey Kick
Setup: Start on all fours with a band looped around one foot. Keep your hips level and brace your core before you start the movement.
Move: Drive your heel toward the ceiling while keeping your knee bent to 90 degrees. Your hips should stay square to the floor. Squeeze your glute at the top, then lower slowly all the way back down.
Sets and reps: 3 sets of 12 per leg. If you notice your lower back arching, don’t kick as high—range of motion matters less than form.
10. Banded Pull-Through
Setup: Anchor a band at hip height on a door or sturdy post. Turn around so your back faces the anchor, grab the band between your legs, and walk forward until there’s tension. Hinge at your hips with a soft bend in your knees and keep your back flat.
Move: Snap your hips forward and squeeze your glutes to stand tall. Your arms are just holding on—this is pure hip drive. Let the band pull you back into the hinge, then repeat.
Sets and reps: 3 sets of 15. This is the closest thing to a kettlebell swing with a band, and it’s brutal in the best way.
Run through all ten moves once a week, or pick five and rotate them between sessions. Rest 60 to 90 seconds between sets, and move up a band level when you can hit the top of the rep range without your form falling apart.
Curious about the band sets mentioned here? Check current prices on Amazon and see which one fits your home gym. And if you try the workout, drop a comment below and tell me which exercise made your glutes scream the loudest.
Common Form Mistakes That Kill Your Glute Gains
You can chase the strongest bands, pile on sets, and still walk away with sore quads and an untouched backside. The equipment was never the problem. Most of the time, it’s the way you’re moving beneath the band.
I’ve spent plenty of home workouts staring at my own reflection while doing banded glute work, and I’ve made every mistake below. Fix these five and you’ll feel your glutes working within one session.
1. Your Knees Caving Inward
Loop a band just above your knees and squat. If your knees drift together, the band loses tension and your glute medius checks out. Your quads and adductors grab the workload, and your glutes get almost none of the stimulus they need.
Spread the floor apart with your feet as you stand. Push your knees out against the band the whole time, like you’re trying to break it. Keep that outward pressure even at the top. If you’re just learning the cue, a light loop set like the Fit Simplify Resistance Loop Bands Set gives you enough tension to feel the glute medius fire without forcing your knees into a weird angle.
2. Arching Your Lower Back at the Top of Bridges and Thrusts
Hyperextending your spine at the top looks like you’re getting height, but it’s actually stealing tension from your glutes. The bridge gets higher while your glutes stay passive, and your lower back absorbs the pressure.
Drive through your heels and press your hips forward in a straight line. At the top, tuck your pelvis slightly and squeeze your glutes as hard as you can. Keep your ribs down. If your rib cage flares up, your spine is the one working, not your glutes.
3. Rushing the Reps
Momentum is the easiest way to make a banded hip thrust feel easy and do nothing at the same time. When you bounce through the movement, the band does the work and your glutes spend almost no time under tension.
Take 2 to 3 seconds to lower back to the start. Pause briefly at the bottom, then drive through your heels. If you can’t slow down without the band dragging you around, use a lighter band for a few sets. I’d rather see ten controlled reps than thirty sloppy ones.
4. Band Slipping Down or Rolling Up
A band that creeps onto your kneecap is more than annoying. It can pinch the joint and mess with your tracking mid-exercise. Position the band above your knees, not on the kneecap. If it still rolls, switch to a wider loop that has more surface area.
Before you even start, run your fingers along the band for tears, dry rot, or worn spots. A snapped band mid-rep can sting and throw you off balance. For hip thrusts and squats, I like the wider loop on the Serious Steel Heavy Resistance Bands Set because it stays put without digging into my quads.
5. Letting Your Lower Back Take Over
This one usually shows up with a soft core. Your torso drifts forward, your ribs flare, and the band pulls you into a slight overextension. Your lower back holds that position while your glutes sit back and watch.
Brace your core before every rep like someone is about to punch your stomach. Keep your ribs stacked over your pelvis and your spine neutral. During lateral walks, that stable center matters even more — it’s what carries the load from your legs into your glutes.
Check the current prices on Amazon if you need a band set that works for your setup. And leave a comment below: which of these mistakes showed up in your last workout? Once you fix it, I promise the next one will feel completely different.
Put Together a Banded Glute Workout
Everything above is just a list of moves until you put them together. Here’s the exact setup I use at home with loop bands. It works for a beginner, and it still makes me want a glass of water by the last set.
Warm-Up
Start with 5 minutes of light cardio. Jumping jacks, high knees, marching in place, or walking up and down the stairs all work. Then grab the lightest loop from the Fit Simplify Resistance Loop Bands Set and do 15 banded glute bridges. Keep the movement slow and squeeze at the top. That’s enough to wake up your glutes without tiring them out.
One Full Round
A round means this: perform all 10 exercises in the order listed above, and do 2 sets of each exercise. Rest 45 to 60 seconds between every set. That includes the rest between set 1 and set 2 of the same exercise. In total, one round gives you 20 working sets.
- Warm-up: 5 minutes light cardio, then 15 banded glute bridges with a light band
- Main session: 10 exercises x 2 sets, 45-60 seconds rest between sets
- Cool-down: 5 minutes of hip and glute stretching
If you’re new to this, do one round only. That’s the smart way to start. After a few sessions, if the workout feels easy and you aren’t sore the next day, you can add a second round. Keep that second round lighter by choosing a thinner band and staying closer to 10 reps instead of 20. Don’t jump to three rounds. With bands, the constant tension means two strong rounds are enough for most people.
Do this workout 2 or 3 times a week, with at least one rest day between sessions. A Monday/Wednesday/Friday schedule works well because it gives your glutes a day off between sessions and leaves the weekend clear.
I keep the medium and heavy loops from the WODFitters Resistance Band Set on the floor beside my mat. It makes it easy to switch resistance between exercises without breaking momentum. If you only have one band, don’t overthink it; just use what you have and focus on control.
Cool Down and Stretch
When the last set is done, take 5 minutes to stretch. Lie on your back for the figure-four stretch. Cross one ankle over the opposite knee, pull the bottom leg toward your chest, and hold for 30 to 45 seconds per side. Then sit back into child’s pose for a minute or two. Your hips and lower back will settle down quickly.
One full round with warm-up and cool-down usually takes 25 to 35 minutes. That makes it easy to fit into a lunch break or before dinner.
Check the current prices on Amazon for the Fit Simplify Resistance Loop Bands Set and the WODFitters Resistance Band Set if you need a set. And leave a comment below telling us which exercise made your glutes feel it the next day. For me, it was the banded hip thrust. I felt that one for two days.