Push-Up Variations: From Beginner to Advanced
Push-Up Variations: From Beginner to Advanced
You can walk into any gym in America and see someone doing push-ups badly. That’s not a dig at them. It’s just that the push-up looks deceptively simple. Place your hands on the floor, lower your chest, push back up. How hard can it be?
Hard enough that most people never master it properly. And harder still that there are at least 53 push-up variations you can work through as you get stronger. I’ve been coaching this movement for years, and I can tell you one thing for sure: the person who masters push-ups has a stronger core, bigger chest, more resilient shoulders, and better shoulder blade control than the person bench pressing twice their body weight.
This guide covers the essential push-up variations from beginner to advanced. You’ll learn each move with proper form, what muscle it targets, and where it fits in your progression. Let’s start with the foundation.
Why Push-Ups Matter More Than You Think
A push-up is not a chest exercise. I mean, it is a chest exercise. But it’s also a core exercise, a shoulder exercise, a triceps exercise, and a test of full-body tension. When you do a proper push-up, every muscle from your neck to your ankles is working to keep your body rigid.
The push-up trains the pectorals (chest), deltoids (shoulders), triceps (back of arms), and the entire anterior chain (front of your body). It improves scapular stability, wrist mobility, and shoulder health. And it requires zero equipment. You could be stuck in a hotel room with no gear and still get a world-class chest workout.
Most people who skip push-ups in favor of bench pressing end up with an imbalance. Their chest gets strong but their shoulder stabilizers stay weak. Push-ups fix that.
The Standard Push-Up: Your Form Foundation
Before you try any variation, you need to lock down the standard push-up. If your form breaks down here, every other variation will amplify those mistakes.
- Hand placement: Hands slightly wider than shoulder-width apart, fingers pointing forward or slightly outward.
- Body position: Straight line from your head through your heels. No sagging hips, no raised butt.
- Elbow angle: Elbows at about 45 degrees to your torso. Flaring them out to 90 degrees puts your shoulders at risk.
- Descent: Lower your chest until it’s about an inch from the floor, or until your elbows hit 90 degrees. Touch your chest to the ground if you have the mobility.
- Ascent: Push through the whole palm, not just the heel of your hand. Lock your elbows at the top but don’t hyperextend.
- Breathing: Inhale on the way down, exhale on the way up.
Form check: Record yourself from the side. If your hips drop as you lower down, your core lost tension. If your head pokes forward, your neck is compensating. Fix both before adding reps.
If you can’t do 5 clean standard push-ups yet, start with the beginner variations below. No shame in that. Everybody starts somewhere.
Beginner Push-Up Variations
Wall Push-Up
This is the gentlest entry point. Stand facing a wall at arm’s length and place your hands on the wall at chest height. Lean forward and lower your chest toward the wall, then push back. That’s it.
Wall push-ups build coordination and basic pressing strength without loading your joints. Do 3 sets of 15 to start. When those feel easy, move closer to the ground.
Knee Push-Up
Drop your knees to the floor while keeping your body in a straight line from your knees to your head. This reduces the load by about 50% compared to a standard push-up.
Keep your ankles together or crossed. Don’t let your hips drift forward or backward. Lower your chest to the floor and push back up. Aim for 3 sets of 10 clean reps before progressing.
Common mistake with knee push-ups: People lower their upper body but keep their hips high, creating an incline. Your torso and thighs should stay in one line. If your hips are up, you’re doing an incline push-up, not a knee push-up.
Intermediate Push-Up Variations
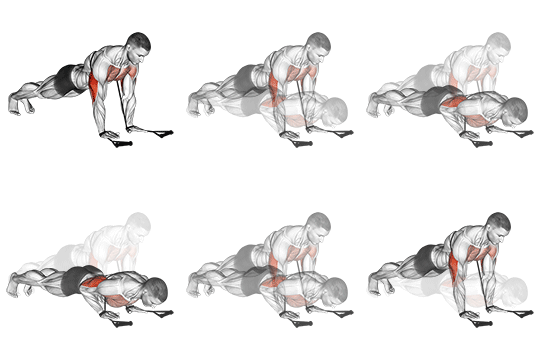
Diamond Push-Up (Triceps Focus)
Place your hands directly under your chest with your thumbs and index fingers touching, forming a diamond shape. The narrow hand position shifts most of the work to your triceps and the inner part of your chest.
Your elbows will travel backward along your ribs as you lower down. Keep them close to your body. Diamond push-ups are significantly harder than standard ones. If you can only do 3 to 5, that’s normal.
This variation pairs well with the band close-grip push-up , which adds accommodating resistance through a band looped around your back. The band makes the top portion harder while assisting slightly at the bottom, giving you a more complete triceps stimulus.
Wide Push-Up (Chest Focus)
Place your hands about twice shoulder-width apart. This wider angle emphasizes the pectorals, specifically the outer chest. Lower yourself until your chest is just above the floor.
Be careful with this one. The wider your hands go, the more stress lands on your shoulder capsules. Don’t take it past a comfortable range of motion. Stop when you feel strain in the front of your shoulders.
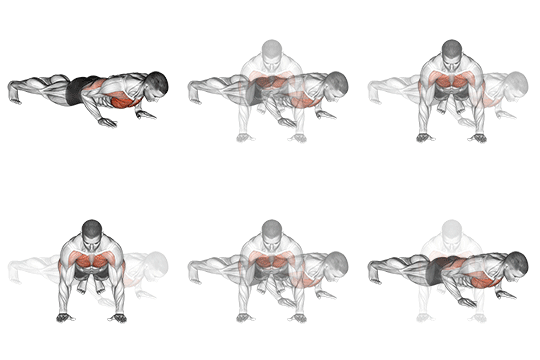
Decline Push-Up (Upper Chest Focus)
Place your feet on an elevated surface (a bench, a chair, or a couch cushion) and your hands on the floor. The higher your feet go, the more weight shifts to your upper chest and front deltoids.
Start with a low elevation like 12 inches. Your body should still form a straight line. Don’t let your hips sag just because your feet are up. The clock push-up is an advanced variation of this concept where you move your hands around a circular pattern targeting your pectorals from different angles.
Advanced Push-Up Variations
Pike Push-Up (Shoulder Strength)
Get into a downward dog position with your hips high and your body forming an inverted V. Your hands stay on the floor, and your feet are hip-width apart. Lower your head toward the floor by bending your elbows, then push back up.
Pike push-ups build shoulder pressing strength and prepare you for handstand push-ups. Your focus should be on getting your head between your hands rather than forward of them. If you feel it mostly in your upper back, you’re doing them right.
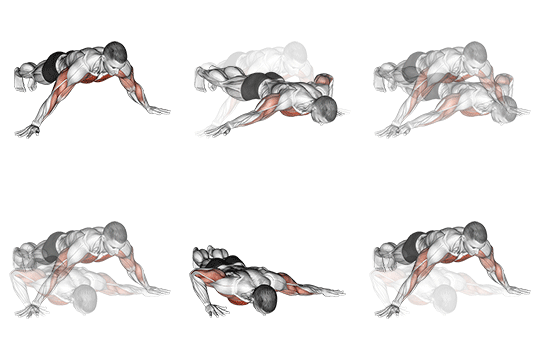
Archer Push-Up 6 steps
Body weight | Targets: Pectorals
The archer push up is one of the most effective advanced push-up variations for building unilateral chest strength. This move shifts your weight onto one arm while the other arm extends out to the side for balance.
- Start in a wide push-up position with your hands about twice shoulder width apart.
- Shift your weight onto your right side and bend your right elbow, lowering your chest toward your right hand.
- Your left arm stays straight and slides out to the left side as you descend.
- Lower until your chest nearly touches the floor above your right hand.
- Push through your right palm to return to the start position.
- Repeat on the other side. That’s one rep.
This 6-step movement builds serious shoulder stability and addresses strength imbalances between your left and right sides. Most people find one side significantly weaker. That’s the point. Your weaker side dictates your progress.
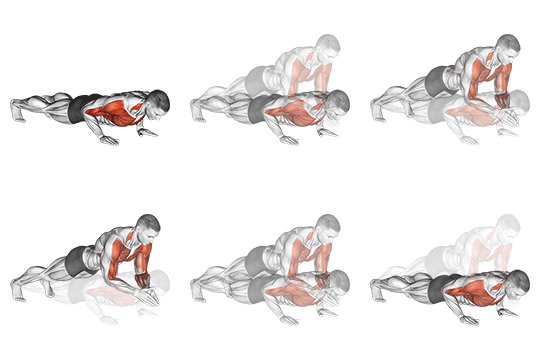
Plyometric / Clap Push-Up (Explosive Power)
This is the party trick that also builds real explosive strength. Lower yourself into a standard push-up, then drive up with enough force that your hands leave the floor. Clap your hands together at the top, then land softly and immediately go into the next rep.
The clap push up targets your pectorals and trains fast-twitch muscle fibers. These fibers are responsible for explosive power, which carries over to sports, sprinting, and even everyday athleticism.
Warning: Land with soft elbows. If you lock out on the landing, you’re pounding your joints. And never attempt these until you can do at least 15 clean standard push-ups. Your tendons need to be ready for the impact.
Common Form Mistakes (And How to Fix Them)
I’ve watched hundreds of people do push-ups. Here are the same five mistakes that show up every time.
1. Flared elbows. Your elbows should be at roughly 45 degrees to your torso, not 90 degrees. Flared elbows put your rotator cuff in a vulnerable position. Fix it by squeezing your armpits slightly as you lower down.
2. Sagging hips. This usually means your core gave out. Your lower back arches and your belly drops toward the floor. Brace your abs like someone is about to punch you in the stomach. Keep that tension throughout the whole rep.
3. Half reps. You lower an inch, pause, and push back up. Maybe you’re saving energy. Maybe you’re just lazy. Either way, a half rep is not a rep. Lower your chest to within an inch of the floor. Full range of motion every single time.
4. Head poking forward. Your neck cranks forward like a turtle. This happens when your upper back is weak or your chest is tight. Keep your chin tucked and your gaze about 12 inches in front of your hands.
5. Hands too far forward. Your hands should be under your shoulders, not in front of them. If your hands are way out ahead, you’re doing a decline push-up without realizing it. Reset your hand position.
How to Build Up to 50 Push-Ups
Going from zero to 50 consecutive push-ups takes time. Here’s a progressive plan that works.
Phase 1: Accumulation (Weeks 1 to 3)
Do as many push-ups as you can in one set. Rest 60 seconds. Repeat for 5 sets. Your total across all sets is your volume. Aim to increase that volume by 1 rep per set each workout. If you hit 5 sets of 10 on Monday, try 5 sets of 11 on Thursday.
Phase 2: Density (Weeks 4 to 6)
Set a timer for 5 minutes. Do as many push-ups as you can in that time, resting only when you need to. Record your total. Next workout, beat it by at least 2 reps. This teaches your body to recover faster between mini-sets.
Phase 3: Max-Out (Weeks 7 to 9)
Once a week, test your max reps in one set. The other two workouts stay in density or accumulation mode. If your max is stuck at 35, go back to accumulation with higher volume. The wall is usually mental, not physical. Push past it.
Phase 4: The 50-Rep Goal (Week 10+)
When you can hit 40 reps, start doing ladders. Do 10 reps, rest 15 seconds, do 9 reps, rest 15 seconds, all the way down to 1 rep. That totals 55 reps with short rests. This format breaks the mental barrier of a single massive set.
Pro tip: Train push-ups at least 3 times per week. You can go heavy one day (decline or weighted push-ups). Go moderate another day (standard push-ups with perfect form). Go light and fast the third day (high volume, short rest). Your body needs variety to keep adapting.
Conclusion
The push-up is not glamorous. It won’t impress anyone on Instagram. But it will build a stronger, more resilient upper body than most machines ever could. The push-up variations from beginner to advanced in this guide give you a roadmap that can last years. Start wherever you are today. Do the wall push-ups if that’s your level. Do the archer push-ups if you’re ready for a challenge. Just keep progressing.
Your chest won’t grow from fancy programming. It grows from applying tension to muscle fibers and then recovering. Push-ups deliver that tension. All you have to do is show up and lower yourself to the floor one more time than you did last week.
Medical & Editorial Review: This article was reviewed by Liam Smith, founder of Apexfito, for accuracy and safety. Content is for educational purposes and is not a substitute for professional medical advice. Consult your physician before starting any exercise or nutrition program.