How to Do a Barbell Deadlift: Complete Guide to Perfect Form
How to Do a Barbell Deadlift: Complete Guide to Perfect Form
I’ve coached a lot of people through their first deadlift. And almost every single one of them walks up to the bar, looks at it, and does something weird. They round their back. They yank the bar. They look like a scared cat trying to lift a grocery bag. That was me too, once. The deadlift is the most honest lift in the gym. It doesn’t care about your Instagram form checks or your lifting belt. It just exposes whatever weakness you have in your posterior chain, your grip, or your nerve. So let’s fix that.
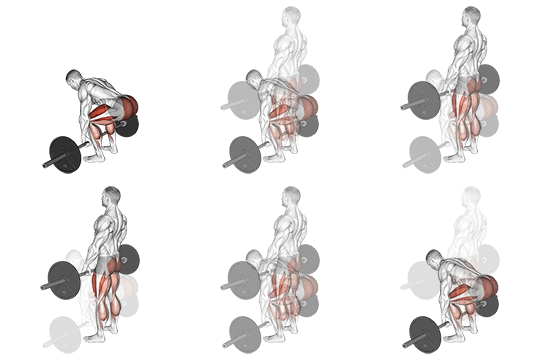
This guide walks you through exactly how to do a barbell deadlift with proper form, what muscles you’re actually working, the mistakes I see every day in the gym, and which variations are worth your time.
What Muscles Does the Deadlift Work?
When someone says the deadlift is a “back exercise,” I shake my head. When someone says it’s a “leg exercise,” I shake it the other way. The deadlift is a full-body pull that happens to heavily target your glutes and hamstrings. Here’s the breakdown based on the actual muscle recruitment:
- Glutes (Target Muscle): Your glutes are the primary driver. They extend your hips at the top of the lift. If your deadlift doesn’t feel like a glute exercise, you’re probably not using your hips correctly.
- Hamstrings (Secondary): Your hamstrings work hard during the initial pull off the floor. They help stabilize your knee angle and assist in hip extension. Tight hamstrings will wreck your setup before you even break the bar off the ground.
- Upper Back (Secondary): Your lats, traps, and rhomboids work isometrically to keep the bar close to your body and your shoulders packed. A weak upper back means the bar drifts forward, which puts your spine in a bad spot.
- Spinal Erectors (Secondary): Your lower back muscles stabilize your spine throughout the movement. They’re not meant to be the prime movers, but they take a beating if your form breaks down.
- Core and Grip: Your abs brace against the belt (or lack of one), and your forearms fight to hold the bar. Both get a serious workout whether you realize it or not.
The barbell deadlift hits more muscle mass in a single movement than just about anything else you can do in a gym. That’s why it works for building strength, adding mass to your legs and back, and even improving your posture if you do it right.
Step-by-Step Deadlift Setup
I’m going to walk you through each step the way I teach it to beginners at the gym. No fluff, no cues that sound cool but mean nothing.
Step 1: Set Your Feet
Stand with your feet shoulder-width apart and the barbell on the ground in front of you. The bar should be over the middle of your foot. I like to say the bar should bisect your foot — if you drew a line across the middle of your shoe laces, the bar sits right on top of that line. Your toes can point slightly outward, maybe 15 to 30 degrees.
Step 2: Grip the Bar
Bend your knees and hinge at the hips to lower your torso down. Take an overhand grip on the barbell, slightly wider than shoulder-width apart. Don’t squat down to the bar. Hinge back. Your shins should touch the bar, and your hips should be higher than they would be in a squat. Most beginners sit too low. Hips up, chest down.
Step 3: Set Your Spine
Keep your back straight, chest up, and core engaged. This is the part where I watch people take a deep breath and then forget to hold it. Pull your shoulders back and down — pack your lats like you’re trying to crush oranges in your armpits. Your spine should be neutral from your neck to your tailbone. If you look like a Halloween cat, you’re too rounded.
Step 4: Drive Through the Floor
Drive through your heels and extend your hips and knees to lift the barbell off the ground. Think of pushing the floor away from you, not pulling the bar up. This mental cue fixes so many form issues. Your hips and shoulders should rise at the same speed. If your hips shoot up first, you turned your deadlift into a stiff-legged deadlift before the bar even left the floor.
Step 5: Pull the Bar Close
Pull the barbell close to your body as you stand up straight. I mean literally drag it up your shins and thighs. If there’s a gap between the bar and your legs, you’re losing leverage and putting your lower back at risk. The bar path should be a straight vertical line. Any forward swing of the bar is wasted energy and a red flag for your form.
Step 6: Lower With Control
Lower the barbell back to the ground by hinging at the hips and bending your knees. Don’t just drop it from the top unless you’re doing touch-and-go reps and you know what you’re doing. Push your hips back, let the bar travel down your thighs, and once it passes your knees, bend them to get the bar to the floor. Control the descent. It builds more muscle and keeps you safer.
Common Deadlift Mistakes
I’ve been lifting for years, and I still catch myself falling into these traps. Here are the ones I see most often.
Rounding the Lower Back
This is the big one. A rounded lower back under heavy load is a fast track to a disc injury. Your spine is strongest in a neutral position. If you can’t keep your back straight with a given weight, it’s too heavy. Drop the weight. Fix your bracing. Your ego will survive. Your spine might not if you keep going with a rounded back.
Bar Too Far From the Body
If the barbell drifts forward even an inch, the leverage shifts from your posterior chain to your lower back. The bar should be in contact with your body the entire time. Shins, thighs, hips. If you see a gap between the bar and your legs on video, that’s your problem. The fix is simple: pull the bar into your body before you start lifting.
Hips Rising First
This one is subtle but destructive. When you start the lift and your hips shoot up faster than your shoulders, you end up in a stiff-legged position where your lower back takes all the load. The bar stalls around mid-thigh, and you either drop it or hitch it up. The fix: start with your hips in the right position (higher than a squat, lower than a stiff-legged deadlift) and push through your whole foot, not just your toes.
Overextending at the Top
You see this in every commercial gym. Someone locks out their deadlift and then leans back like they’re trying to show off their abs to someone behind them. Don’t do this. You don’t need to lean back. Stand up straight, squeeze your glutes, and that’s it. Overextending puts unnecessary shear force on your lumbar spine.
Wearing the Wrong Shoes
Deadlifting in running shoes with squishy soles is like trying to do a heavy lift on a mattress. You lose force transfer through your feet. Flat shoes, deadlift slippers, or barefoot are the way to go. If your gym allows it, take your shoes off. You’ll feel more stable immediately.
Deadlift Variations
Not every deadlift has to be a conventional barbell pull from the floor. Here are variations worth trying, depending on your goals and your body proportions.
Conventional Deadlift
This is the one I just described. Feet shoulder-width, hands outside the knees, bar starts on the floor. It’s the most common style and works well for most people. If you have longer arms relative to your torso, conventional deadlifting will feel more natural because your starting hip position is naturally higher.
Sumo Deadlift
Feet wide, toes pointed out, hands inside the knees. The sumo deadlift shortens the range of motion and shifts more load to your quads and adductors. If you have a long torso and short arms, sumo might suit you better. It also tends to be easier on the lower back because your torso is more upright at the start. Try both conventional and sumo. Pick the one that lets you lift the most weight with the best form.
Romanian Deadlift (RDL)
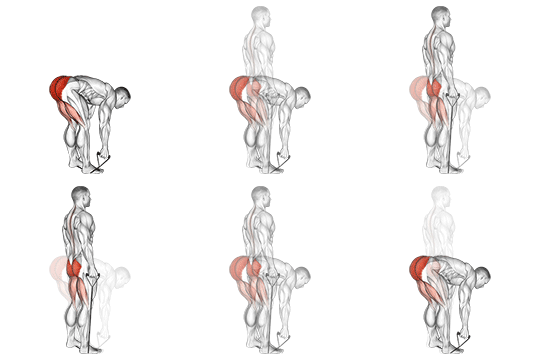
Think of the RDL as the hip-hinge variation without the floor component. You start with the bar at your hips, push your hips back, and lower the bar to about mid-shin. No bounce off the floor. No knee bend past a slight softness. The RDL demolishes your hamstrings. It’s also a good way to practice the hip hinge if you struggle with it in the conventional deadlift. The band stiff leg deadlift follows a similar pattern but adds accommodating resistance through the band tension at the top.
Single-Leg Deadlift
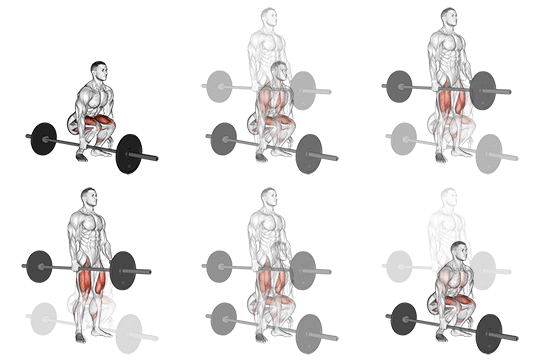
The barbell one arm side deadlift is a different take — you load one side of the bar and stand beside it, deadlifting with one arm. This variation forces your obliques and spinal stabilizers to work overtime to keep you from tipping over. It’s not a max-effort lift. It’s a corrective and stability movement. If you have a strength imbalance between your left and right sides, this variation will expose it fast.
Other variations I like: the band stiff leg deadlift adds tension at the top where you’re strongest, and the deficit deadlift forces you to pull from a lower starting position if you need extra range of motion. But for most people, mastering the conventional deadlift and adding the RDL as an accessory is enough.
Beginner Tips
If you’re new to the deadlift, here’s what I’d tell you that I wish someone told me when I started.
Start with the bar only. Or 95 pounds if your gym doesn’t have bumper plates. The empty bar on a standard 45-pound plate might sit too low, so put plates or blocks under it to get the correct starting height. The deadlift feels weird with a light weight because the bar is light enough that you can muscle it up with bad form. Film yourself. Compare what you see to the setup I described above.
Don’t use a mixed grip until you need to. Double overhand grip builds your grip strength and keeps your shoulders symmetrical. Once your grip gives out before your legs and back do, switch to a mixed grip (one hand over, one under) or use straps. Hook grip is another option, but it hurts until your thumbs get used to it.
Breathe and brace on every rep. Take a deep breath into your belly before each rep, hold it, lift, and exhale at the top or on the way down. This creates intra-abdominal pressure that protects your spine. If you breathe out during the lift, you lose that pressure and your core goes soft.
Two warm-up sets are not optional. Do 5 reps with just the bar, then 3 to 5 reps at about 50 percent of your working weight. Then start your work sets. Your body needs to groove the movement pattern before you load it. I’ve seen too many people walk up to a heavy bar cold and hurt themselves on rep one.
Deadlift once or twice a week, not every day. The deadlift is taxing on your central nervous system. More isn’t better. Two quality deadlift sessions per week with good form will get you further than four sloppy ones. Your recovery matters as much as the workout itself.
Final Thoughts
I don’t think the deadlift is mandatory for everyone. If you have a history of back injuries or your anatomy doesn’t agree with the movement, there are other ways to build a strong posterior chain. But if you can deadlift, and you do it with correct form, it’s one of the most rewarding lifts you’ll ever do. It teaches you how to brace, how to generate tension, and how to move weight that looks ridiculous to people who don’t lift.
The barbell deadlift isn’t complicated. It’s just unforgiving. Get your setup right, keep the bar close, and let your hips do the work. That’s the whole thing. Everything else is just noise.
Related Reading
Related Reading
Medical & Editorial Review: This article was reviewed by Liam Smith, founder of Apexfito, for accuracy and safety. Content is for educational purposes and is not a substitute for professional medical advice. Consult your physician before starting any exercise or nutrition program.
Related: How Much Should You Deadlift? Honest Standards by Level

2 Comments