How to Master the Pull-Up: From Zero to 10 Reps
How to Master the Pull-Up: From Zero to 10 Reps
Pull-ups are the exercise everyone wants to do and almost nobody can do well. Walk into any commercial gym and watch the pull-up bar. You’ll see people jumping into the top position, kipping like their life depends on it, or hanging there for three seconds before giving up. I’ve been there. I spent my first six months pulling myself halfway up before falling off the bar in defeat.
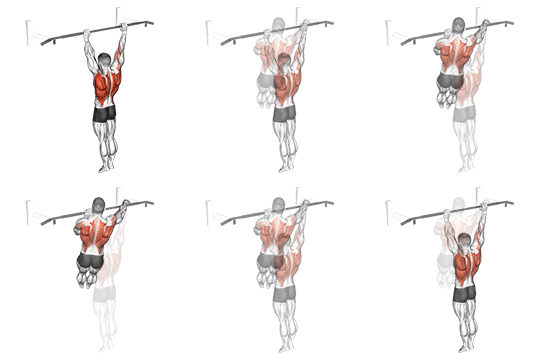
The reality is that a full-range, dead-hang pull-up requires you to lift your entire body weight with just your back and arms. That’s genuinely hard. Most adult men can’t do one. Most adult women can’t either. But here’s the truth: anyone can learn. With the right progression and consistent practice, you can go from zero to 10 clean pull-ups in about 12 weeks.
This article lays out the complete how to master the pull-up progression using six concrete steps, pulled from a dataset of over 30 pull-up variations. You don’t need fancy equipment. You need a bar, some patience, and the willingness to look weak for a few weeks.
Why Are Pull-Ups So Hard?
Three reasons. First, you’re lifting your full body weight with a relatively small muscle group. Your lats and biceps have to generate enough force to pull your entire torso upward. That’s a lot of demand on a small engine.
Second, most people have weak lats and rear deltoids because we spend our lives hunched forward over desks and phones. The pull-up requires you to pull your shoulder blades down and together, which is the exact opposite of your daily posture. Your brain literally has to learn a new movement pattern.
Third, grip strength. If your forearms give out before your back does, you can’t finish the set. Many people fail not because their lats are weak but because their hands can’t hold on long enough.
Understanding these barriers helps you address them directly. The six steps below tackle each one in order.
Step 1: Dead Hangs
Step 1 Build grip endurance and shoulder comfort
Before you can pull yourself up, you need to be able to hang from the bar without pain or fear. Dead hangs are exactly what they sound like. Grab the bar with an overhand grip (palms facing away), let your body hang straight down, and hold on.
- Grip: Overhand or mixed grip. Start with overhand. Use chalk if your hands are sweaty.
- Shoulder position: Let your shoulders relax up toward your ears at the bottom. You don’t need to keep them engaged yet. That comes later.
- Breathing: Breathe normally. Don’t hold your breath. Relax into the hang.
- Time: Aim for 3 sets of 30 seconds. Once you can comfortably hold for 60 seconds, move to Step 2.
Dead hangs also decompress your spine. If you spend all day sitting, this alone might fix some of your back pain. Three sets of 30 seconds between workouts is a reasonable starting dose.
Step 2: Scapular Pulls
Step 2 Teach your shoulder blades to move
Hang from the bar with your arms straight. Without bending your elbows, pull your shoulder blades down and together by engaging your lats and lower traps. Your body will rise about two inches. That’s it. Lower back down with control.
- Movement: Small and controlled. You’re not trying to pull yourself up. You’re just activating the scapular muscles.
- Sets and reps: 3 sets of 10 scapular pulls. Hold the top position for 1 to 2 seconds each rep.
- Progression: When you can do 3 sets of 15 with full scapular control, move to Step 3.
This step is where most people skip ahead and pay for it later. Scapular control is the foundation of every pull-up variation. Without it, you’ll pull with your arms instead of your back, which limits your progress to around 5 reps and increases your injury risk.
Step 3: Negatives (Eccentric Pull-Ups)
Step 3 Build strength through the lowering phase
Jump or step up to the top of a pull-up position (chin over the bar). Then lower yourself down as slowly as possible. Aim for a 3 to 5 second descent. That’s one rep. Jump back up and repeat.
- Tempo: 4 seconds down, no pause at the bottom, reset and go again.
- Sets and reps: 3 sets of 5 to 8 negatives. Rest 90 seconds between sets.
- Progress check: When you can lower yourself in 7 seconds or more without shaking violently, you’re ready for Step 4.
Negatives build strength more efficiently than any other pull-up drill. The eccentric (lowering) phase of a movement can handle more load than the concentric (pulling) phase. So even if you can’t pull yourself up, you can build the strength to do so by controlling the descent.
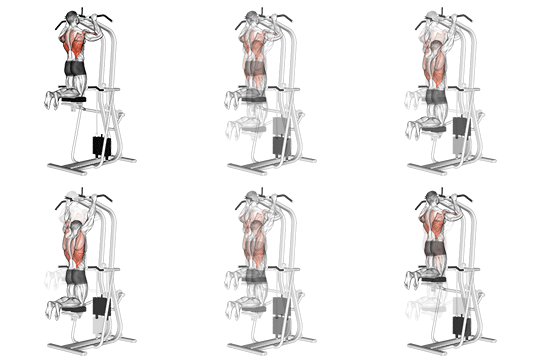
If you have access to a machine, the assisted pull-up is a solid alternative. This 7-step exercise uses a leverage machine that counterbalances some of your body weight, letting you practice the full range of motion with less load. Set the counterweight so you can do 5 to 8 clean reps and gradually reduce it over weeks.
Step 4: Band-Assisted Pull-Ups
Step 4 Practice the full movement with help
Loop a resistance band over the pull-up bar and put your knee or foot in the loop. The band takes off some of your body weight, making the pull-up achievable. Thicker bands offer more assistance. Start with a heavy band and work your way down to thinner ones.
- Band choice: Use a band that lets you do 5 to 8 clean reps. If you can’t manage 3 reps, the band is too thin. If you can do 15 reps, it’s too thick.
- Form: Same as a full pull-up. Engage your lats, pull your chest to the bar, lower with control.
- Progression: Over 4 to 6 weeks, move from a thick band to a medium band to a thin band. When you can do 8 reps with the thinnest band, test an unassisted pull-up.
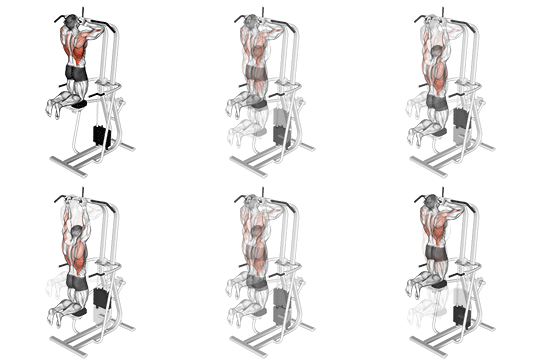
If you don’t have bands, the assisted parallel close grip pull-up is another option. This variation uses parallel handles at close width, targeting the lats from a slightly different angle. The neutral grip (palms facing each other) is often easier on the wrists and shoulders while still building the pulling strength you need.
Step 5: Your First Full Pull-Up
Step 5 Locking in the real thing
Your first unassisted pull-up is a milestone. Here’s how to approach it. Start from a dead hang. Take a big breath, brace your core, and pull your shoulder blades down and together. Then pull your chest up toward the bar. Don’t worry about getting your chin over. Focus on pulling until you physically cannot go higher.
If you get stuck in the middle of the pull, try these tweaks:
- Arch your chest toward the bar. Think about pulling the bar to your upper chest, not your chin.
- Squeeze your glutes. This stabilizes your pelvis and transfers more power from your back to your arms.
- Use a slight kip on the first rep. A small leg drive to get you past the sticking point. Once you’re past it, go slow and controlled.
Your first pull-up will be ugly. That’s fine. Do one negative after every failed attempt. The volume adds up.
Step 6: Adding Reps (From 1 to 10)
Step 6 Building volume without burning out
Once you have your first pull-up, the goal shifts to adding reps. This is where most people hit a wall because they try to add too much too fast. Here’s what actually works.
- Grease the groove: Do a single pull-up every time you walk past the bar. 10 times a day, 5 to 6 days a week. This builds neural efficiency without fatiguing you.
- Ladder sets: Do 1 rep, rest 30 seconds. Do 2 reps, rest 30 seconds. Continue until you can’t complete the prescribed reps. Start over from 1.
- Cluster sets: Do 2 to 3 reps every 60 seconds for 10 to 15 minutes. This accumulates volume while keeping each set sub-maximal.
- Weighted negatives: Once you can do 5 to 6 reps, add 5 to 10 pounds and do 3 to 4 sets of negatives. Your strength will jump.
For advanced trainees, the archer pull up is a great next step. This 6-step exercise shifts your weight to one side, turning the pull-up into a unilateral pulling movement. You pull more with one arm while the other arm stays straight and reaches out to the side. It’s one of the best ways to build toward a one-arm pull-up, and it targets the lats from a unique angle that standard pull-ups miss.
Common Mistakes That Stall Your Progress
Training too hard too often. Your back muscles need recovery. If you do max-effort pull-ups every day, your central nervous system will fatigue and you won’t progress. Train pull-ups 3 to 4 times per week max. Two of those sessions should be sub-maximal volume work. One session can be a max test.
Not training your biceps directly. The pull-up is a back exercise, but your biceps do a lot of the work. If your biceps are weak, you’ll stall. Add chin-ups, inverted rows, or bicep curls as accessories.
Using too much momentum. A little leg drive on your first rep is okay. But if every rep involves a full-body kip, you’re not building real strength. Go back to Step 3 (negatives) and rebuild your foundation. The strength you build from controlled reps transfers to everything else. Kipping strength only transfers to more kipping.
Ignoring grip strength. If your hands give out before your back, you have a grip problem. Dead hangs, farmer’s carries, and towel hangs will fix this. Your forearms adapt fast. Two weeks of grip work makes a noticeable difference.
Skipping the warm-up. Cold shoulders and cold lats are a recipe for injury. Do 10 band pull-aparts, 10 scapular push-ups, and 10 pause dead hangs before your first pull-up set. Your body will thank you.
Chin-Up vs Pull-Up: What’s the Difference?
This debate comes up constantly. The short answer is that a chin-up uses an underhand grip (palms facing you) and a pull-up uses an overhand grip (palms facing away). The difference matters.
Chin-ups recruit more biceps activation because the underhand grip puts your biceps in a stronger mechanical position. Most people can do 2 to 3 more chin-ups than pull-ups. If you’re starting from zero, chin-ups are your best path to your first rep. They build the foundation you need.
Pull-ups recruit more lats and rear deltoids. The overhand grip limits bicep involvement, forcing your back to do more work. This makes pull-ups harder but also more effective for building that V-taper shape.
My advice: do both. Use chin-ups for volume and pull-ups for strength. If you can do 10 chin-ups, you’re probably 4 to 6 weeks of focused work away from 10 pull-ups. Program them in alternating blocks and watch your numbers climb.
Programming for Progress
Here’s a sample weekly schedule for someone working toward 10 pull-ups.
Monday: Dead hangs (3 x 45s), scapular pulls (3 x 12), band-assisted pull-ups (5 x 5 with a medium band).
Wednesday: Negatives (4 x 5 with a 5-second descent), bent-over rows (3 x 10), bicep curls (3 x 12).
Friday: Max rep test (do as many unassisted pull-ups as possible), then ladder sets to accumulate volume. Finish with farmer’s carries (3 x 45s).
Increase your total weekly volume by 10% to 15% each week. If you did 50 total pull-ups (assisted + unassisted) in week 1, aim for 55 to 57 in week 2. Small jumps add up fast.
Recovery note: If your elbows start hurting, back off on volume and add more band work. Most pull-up injuries come from doing too many reps with poor form when you’re fatigued. Stop at 2 reps shy of failure on most sets. The quality of your reps matters more than the quantity.
Conclusion
Going from zero to 10 pull-ups is one of the most satisfying progressions in fitness. It takes time. It takes consistent effort. And it requires you to be okay with looking weak for a while. But the moment you pull your chin over that bar for the first time, all those negatives and band reps feel worth it. The how to master the pull-up progression works if you let it. Start with a dead hang today. Run through the steps in order. Don’t skip ahead. Your 10th rep is waiting for you.
Medical & Editorial Review: This article was reviewed by Liam Smith, founder of Apexfito, for accuracy and safety. Content is for educational purposes and is not a substitute for professional medical advice. Consult your physician before starting any exercise or nutrition program.