Plank Workout: 5 Core Exercises for a Stronger Midsection
Plank Workout: 5 Core Exercises for a Stronger Midsection
You’ve been doing crunches for years and your waistline hasn’t changed. Neither has your back pain. I hear this story at least twice a week from people who think core training means lying on a mat and curling their spine over and over. It doesn’t.
The plank is a better core exercise than any crunch variation. Not because it’s harder, but because it trains your core to do what it’s actually designed for: stabilize your spine against movement. A crunch trains spinal flexion. A plank trains spinal bracing. And spinal bracing is what keeps your lower back healthy when you squat, deadlift, run, or carry groceries.
This plank workout core exercises guide covers five essential plank variations, pulled from a dataset of 9 plank exercises. Each one builds on the last. You’ll learn proper form, common mistakes, and how to progress from a 30-second hold to a 2-minute plank that actually looks like a plank.
Why Planks Beat Crunches Every Time
Crunches have their place. But they train your rectus abdominis (the six-pack muscle) through a very specific range of motion. Planks train your entire core including your transversus abdominis (the deep stabilizer), your obliques (rotational control), your lower back extensors, and even your glutes and shoulders.
A strong transversus abdominis acts like a natural weight belt. It increases intra-abdominal pressure, which protects your spine under load. Crunches don’t do that. Planks do. And planks carry less risk of neck strain because you’re not pulling on your head.
Research on muscle activation consistently shows that planks recruit more total core musculature than crunches. Your deep stabilizers fire harder, your obliques engage more, and your lower back stays in a neutral position. That’s a win all around.
The Standard Front Plank: Your Form Guide
Get into a push-up position but drop your forearms to the floor. Your elbows should be directly under your shoulders. Your forearms are parallel to each other, palms flat on the floor or fists clenched. Your body forms a straight line from your head through your heels.
Key cues:
- Squeeze your glutes. This locks your pelvis in place and prevents your hips from sagging.
- Brace your abs. Pull your belly button toward your spine. Don’t just hold your breath. Actively tighten your abdominal wall.
- Push the floor away. Drive your elbows into the ground like you’re trying to push your body away from the floor. This engages your shoulders and takes pressure off your lower back.
- Keep your neck neutral. Look at a spot about 12 inches past your hands. Don’t tuck your chin or crane your neck up.
Hold this position for as long as you can with perfect form. The moment your hips drop or rise, your set is over. No compromises on form.
Your starting point: If you can hold a front plank for 30 seconds with good form, you’re above average for the general population. If you can hold it for 60 seconds, your core stability is solid. If you can hold it for 120 seconds, you need harder variations, not more time.
5 Essential Plank Variations
1. Side Plank
Lie on your side with your legs stacked. Prop yourself up on your forearm, which should be directly under your shoulder. Lift your hips off the floor until your body forms a straight line from your ankles to your shoulders. Hold.
Targets: Obliques, quadratus lumborum (deep lateral stabilizer), glutes.
Most people can hold a side plank for about half as long as a front plank. That’s normal. The obliques work harder in this position because they have to resist gravity pulling your hips down.
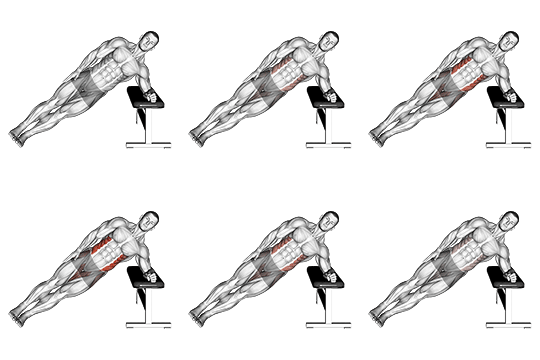
If you find side planks uncomfortable on your bottom shoulder, try the bodyweight incline side plank . This 5-step exercise uses a bench or elevated surface to reduce the load on your supporting arm while still challenging your obliques. Place your forearm on the bench instead of the floor. Your feet stay on the ground. The incline reduces shoulder strain and makes the movement accessible to beginners.
2. Plank with Shoulder Tap
Start in a high plank position (on your hands, not your forearms). Keeping your hips as still as possible, lift your right hand off the floor and tap your left shoulder. Place your hand back down and repeat on the left side.
Targets: Anti-rotation core stability, shoulders, coordination.
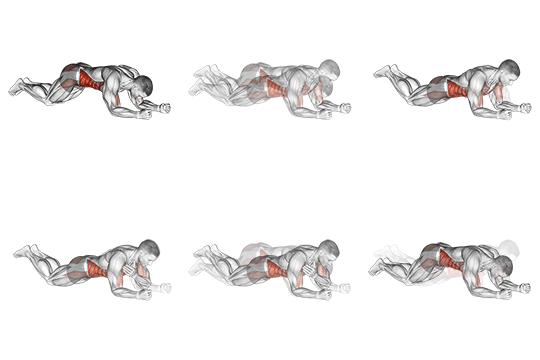
The key is to minimize hip movement. If your hips rock side to side every time you lift a hand, your core is losing tension. Slow down. The kneeling plank tap shoulder is an easier entry point for this movement. Performed from your knees (5 steps total), it reduces the load on your core while you learn the shoulder tap pattern. Once you can do 10 taps per side from your knees without swaying, move to the full version.
3. Plank with Twist
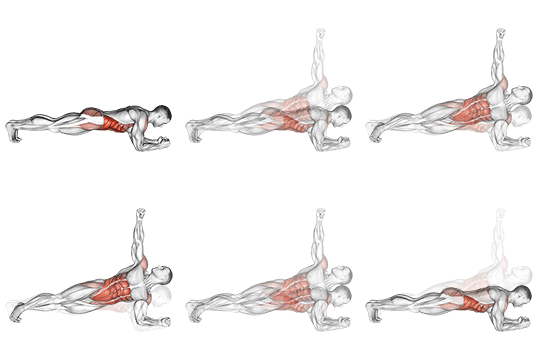
Start in a side plank position on your right side. Raise your left arm straight up. Rotate your torso toward the floor, threading your left arm under your body, then rotate back to the starting position.
Targets: Obliques (rotational), shoulders, thoracic spine mobility.
This is both a core exercise and a mobility drill. The rotation challenges your obliques through a full range of motion while also opening up your upper back. If you spend all day sitting, this movement alone might fix some of your mid-back stiffness.
The front plank with twist is a 7-step variation worth trying once you’ve mastered the side plank version. Instead of starting from a side plank, you rotate from a front plank position. This adds more anti-rotational demand because your core has to fight to keep your hips square while your upper body twists. It’s a serious core challenge.
4. Plank to Downward Dog
Start in a high plank position. Push your hips up and back into a downward dog position, keeping your legs as straight as your hamstrings allow. Pause at the top, then lower back to plank. That’s one rep.
Targets: Full core engagement, shoulder stability, hamstring flexibility, lat activation.
This is a dynamic movement that transitions your core from isometric to anti-extension work. In the plank position, your abs brace against your hips sagging. In the downward dog position, your core switches to supporting a more posterior pelvic tilt. The transition itself trains coordination between your core and your shoulders.
Move slowly. Don’t rush the transition. Each rep should take 3 to 4 seconds. If your lower back arches in the plank at any point, you’re losing core tension and need to reset.
5. Dumbbell Side Plank with Rear Fly
Dumbbell | Targets: Upper back
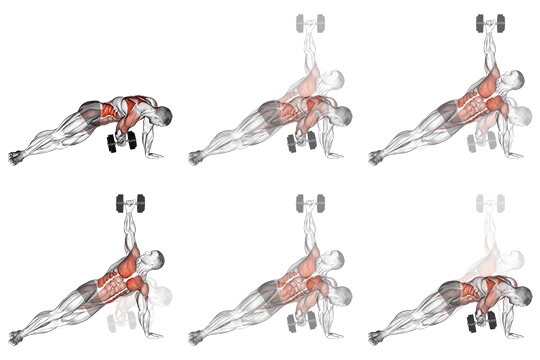
Set up in a side plank position on your right side. Hold a light dumbbell in your left hand (8 to 12 pounds to start). With your left arm extended straight up, perform a rear delt fly by pulling the dumbbell back and down toward the floor, squeezing your shoulder blade. Return to the start.
Targets: Obliques (stabilizing), rear deltoids, upper back (rhomboids, traps).
This is a compound movement that challenges your core stability and your upper back at the same time. While your obliques work to keep your hips up, your rear delts and rhomboids get a direct hit from the fly motion. The dumbbell side plank with rear fly is an advanced variation that requires solid side plank endurance first. Start without the dumbbell to dial in your balance, then add the weight slowly.
Common Plank Mistakes
Hips too high. If your butt is in the air, you’re doing a pike, not a plank. Lower your hips until your body forms a straight line. Think about squeezing your glutes to bring your hips down.
Hips too low. If your lower back arches and your belly drops toward the floor, your core gave out. Your spine is taking the load instead of your abs. Brace harder or end the set.
Head dropped forward. Your neck should be in line with your spine. If you’re looking at your feet or craning your neck up, you’re straining your cervical spine. Pick a spot on the floor a foot past your hands and stare at it.
Holding your breath. People hold their breath during planks because they think it helps. It doesn’t. Breathe steadily. Inhale through your nose, exhale through your mouth. Each exhale is a chance to brace tighter.
Going too long. A 5-minute plank with bad form is worse than a 30-second plank with perfect form. Your time doesn’t matter. Your body position does. Stop when your form breaks.
How Long Should You Hold a Plank?
The internet loves showing people holding planks for 5, 10, even 20 minutes. That’s not useful. After about 90 to 120 seconds, the plank becomes an endurance exercise for your shoulders and lower back, not a targeted core exercise. Your abs stop working as hard and your body starts compensating with other muscle groups.
For building core strength, aim for shorter holds with higher tension. A 30-second plank done with maximum bracing is more effective than a 3-minute plank where you’re just surviving. If you can hold a perfect front plank for 60 seconds, move to harder variations. Don’t chase time. Chase tension.
If you’re just starting, a 10-second plank with good form is a win. Add 5 seconds per week. Most people can reach a 60-second plank in 8 to 10 weeks of consistent practice.
Note on breathing: If you find yourself gasping for air during a plank, your diaphragm is tight. Focus on belly breathing. Push your belly out slightly against your abdominal brace. This sounds counterintuitive, but it actually increases intra-abdominal pressure while keeping oxygen flowing.
Progression Plan: 30 Seconds to 2 Minutes
Week 1 to 2: Front plank only. 3 sets, each held as long as possible with perfect form. Rest 60 seconds between sets. If your longest hold is 20 seconds, that’s your baseline. Next session, aim for 22 seconds.
Week 3 to 4: Add side planks. Do 2 sets of front planks (30-second target) and 2 sets of side planks per side (20-second target). Use the bodyweight incline side plank if standard side planks are too hard. Start integrating the plank with shoulder tap on one of your workout days.
Week 5 to 6: Rotate between four exercises. Front plank (45 seconds), side plank per side (30 seconds), plank with shoulder tap (10 taps per side), and plank to downward dog (8 reps). Do each one for 2 to 3 sets. Use the kneeling plank tap shoulder if the full version feels unstable.
Week 7 to 8: Your front plank should be comfortably at 60 seconds. Start adding the plank with twist (front plank with twist ) and the dumbbell side plank with rear fly. Do 4 exercises per session, 2 to 3 sets each. Your goal is 90 seconds on the front plank and 45 seconds per side on the side plank.
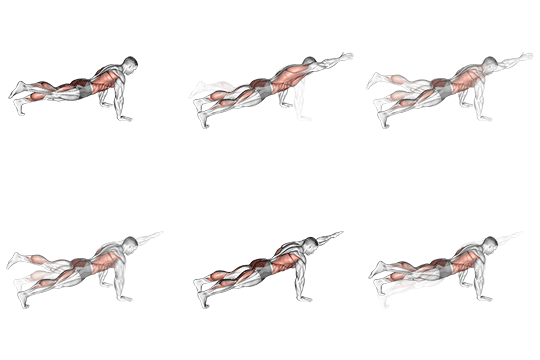
Week 9 to 10: Push your front plank to 2 minutes. If you get there, great. If you stall at 90 seconds, add more resistance instead of more time. Put a weight plate on your lower back or use the power point plank , a 6-step variation that adds movement to the standard plank by having you tap each hand to a target point on the floor in front of you. The dynamic element builds both stability and coordination.
Conclusion
Planks are boring. I’ll say it. Holding a static position for a minute at a time is not the most exciting part of anyone’s workout. But the strength you build from a consistent plank practice shows up everywhere else. Your squat feels tighter. Your deadlift feels more stable. Your lower back stops aching after long days at a desk. The plank workout core exercises in this guide give you a setup that can last months. Master the front plank first. Add the variations one at a time. And remember that a 30-second plank with perfect tension beats a 3-minute plank with a sagging back every time.
Medical & Editorial Review: This article was reviewed by Liam Smith, founder of Apexfito, for accuracy and safety. Content is for educational purposes and is not a substitute for professional medical advice. Consult your physician before starting any exercise or nutrition program.