How to Fix Anterior Pelvic Tilt: Exercises for Better Posture
Full disclosure: Some links in this article are affiliate links. We may earn a small commission at no extra cost to you if you make a purchase through them. Our recommendations are based on what real users report, not on commission size.
What Is Anterior Pelvic Tilt?
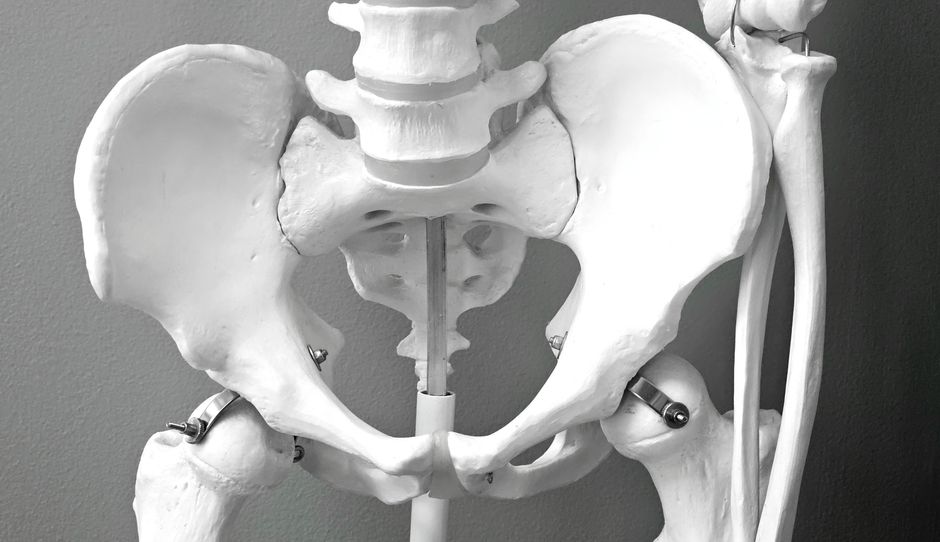
If you’ve ever caught yourself standing with your stomach pushed forward and your lower back arched like a swayback horse, you might have anterior pelvic tilt (APT). It’s one of the most common postural issues I see in the gym — and in daily life, from office workers to runners. APT is simply a position where the front of your pelvis drops downward and the back of your pelvis rises, tilting your hips forward. This increases the natural curve in your lower spine (lumbar lordosis), which often leads to that nagging tightness in the low back and a feeling of tight hip flexors.
APT isn’t a disease or a diagnosis you need to panic over. It’s a muscle imbalance — a pattern of some muscles being too tight (hip flexors, lower back erectors) and others being too weak or inhibited (glutes, abdominals). Your body adapts to hours of sitting or certain training habits, pulling your pelvis into this forward tilt. I’ve had clients who couldn’t believe how much better they felt just by learning to reset their pelvis into a neutral position.
What does “neutral” actually look like? Your pelvis can be compared to a bowl of water. In APT, the water spills out the front. In a tucked or posterior tilt, it spills out the back. Neutral means the water sits level. You can find it by standing with feet hip-width apart, placing your hands on your hip bones, and gently rocking your hips forward and back until you feel the point where your lower back isn’t overly arched nor flattened. That’s your neutral. For many people, holding that feels strange at first — your muscles have to relearn where “home” is. But once you recognize the difference, you can start correcting the imbalance with targeted exercises.
Common Causes and How APT Affects Your Body

If you’ve spent years sitting at a desk, you’ve likely felt that familiar tug in your lower back. Anterior pelvic tilt (APT) rarely comes from one single habit—it’s a slow, gradual adaptation to how you position your body all day long. The main culprits are prolonged sitting, weak glutes and abs, and chronically tight hip flexors and lower back muscles.
When you sit for hours, your hip flexors shorten and stay locked in a flexed position. Your glutes and deep core muscles barely fire. Over time, your body learns to favor this pattern even when you stand. The result is a classic muscle imbalance: overactive hip flexors and lumbar erectors pulling your pelvis forward, while your glutes and transverse abdominis remain underactive and unable to counter that pull.
This imbalance doesn’t just tilt your pelvis—it triggers a chain reaction. Your lower back arches more, creating constant tension in the lumbar spine. Your belly protrudes because the pelvis tilts forward, even if you have low body fat. Your upper body compensates by rounding shoulders forward and jutting your head out. Hip mobility drops because the front of your hip is always in a shortened state.
Common symptoms include a dull ache in the lower back after standing for more than 15 minutes, feeling like you can’t fully extend your hips when walking, and noticing that your stomach sticks out no matter how much you brace. Many people also report that their hamstrings feel perpetually tight—the hamstrings are actually stretched and overworked trying to stabilize the tilted pelvis.
To see if you have APT, try this simple test: lie on your back on a firm surface and slide one hand under your lower back. If there’s a gap bigger than the thickness of your hand at the wrist, your pelvis is likely tilted forward. Another sign is that when you stand, your belt line slopes downward toward the front.
Understanding these causes and effects is the first step—the fix involves consciously lengthening the tight muscles and waking up the weak ones. In the next part of this article, you’ll get a step-by-step exercise plan to rebalance your pelvic position.
4 Essential Exercises to Correct Anterior Pelvic Tilt

These four exercises target the key muscles pulling your pelvis out of alignment—tight hip flexors, weak glutes, a lazy core, and a stiff lower back. I’ve used this sequence with clients for years, and it works because it addresses all the drivers at once. Perform them in order after a light warm-up (think 5 minutes of walking or cat-cow).
1. Half-Kneeling Hip Flexor Stretch
Kneel on your left knee, right foot flat in front, knee bent 90 degrees. Squeeze your right glute and gently drive your hips forward until you feel a stretch in the front of your left hip. Keep your torso upright—don’t lean forward. Hold for a full 60 seconds, breathing deeply into your belly. Switch sides. I usually tell people to set a timer because 60 seconds feels longer than you think. Repeat once more per side if you’re really tight.
2. Glute Bridge with Posterior Pelvic Tilt
Lie on your back, knees bent, feet flat on the floor hip-width apart. Before you lift, tilt your pelvis backward so your lower back presses into the floor. Hold that tilt as you drive your hips up, squeezing your glutes at the top. Lower down with control, maintaining the pelvic tilt throughout. Do 3 sets of 12–15 reps. The tilt at the top is non-negotiable—if you lose it, you’re just using your lower back. Think “pulling your belt buckle toward your ribs.”
3. Dead Bug
Lie on your back with arms extended straight up over your chest and legs in a tabletop position (hips and knees at 90 degrees). Press your lower back into the floor. Slowly extend your right arm overhead and your left leg straight out toward the floor, keeping your back flat. Return to start, then switch sides. Do 3 sets of 8–10 reps per side, moving slow enough that you could pause at any point. If your back arches off the floor, you’re going too fast or too far. Quality over quantity here.
4. Supine Knee Rock
Lie on your back with knees bent, feet flat. Place your hands on your thighs. Tilt your pelvis posteriorly to flatten your lower back, then slowly rock your knees side to side as far as comfortable without losing that flat-back position. Each rock should feel like a gentle stretch across your lower back. Do 10 slow rocks total. Focus on keeping the movement from your hips, not your spine. If you feel a pinching sensation, reduce your range of motion.
Stick with these four moves three to four times per week, and you should start noticing less lower-back tightness and an easier time standing tall within two weeks.
Building a Daily Routine and Tracking Your Progress
Now that you have the exercises, the real work is putting them together into a habit. I recommend doing this routine once a day, either in the morning to loosen up or in the evening to unwind. Stick with it for four weeks straight—that’s typically enough time to feel a noticeable shift in your pelvic position and lower back tightness.
Consistency matters far more than intensity. A focused 10-minute session every day will outperform a 30-minute blitz twice a week. I’ve seen too many people burn out trying to cram everything into long, infrequent workouts. Short daily reps build the neuromuscular patterns that actually hold your pelvis in place.
Here’s your daily routine in order, with quick rep and set reminders:
- Half-Kneeling Hip Flexor Stretch – 60 seconds per side, 1 set. Keep your torso upright and squeeze your glute on the back leg.
- Glute Bridge with Posterior Pelvic Tilt – 12–15 reps, 2 sets. At the top, tuck your tailbone under and hold for 2 seconds.
- Dead Bug – 8–10 reps per side, 2 sets. Press your lower back into the floor throughout the movement.
- Supine Knee Rock – 10 slow rocks, 2 sets. This mobilizes your lower back and reinforces the neutral pelvis position.
Go through the exercises in that order, taking about a minute per exercise. Repeat the circuit twice, and you’re done in roughly 10 minutes. I’ve found this sequence works best because it first opens tight hip flexors, then activates the glutes and core, and finally rocks the spine back to a relaxed neutral.
Track your baseline: Before you begin, stand sideways in front of a mirror and note the angle of your pelvis. After two weeks, check again. You should see a more neutral tilt—less arch in your lower back. If you don’t see a change, check that you’re actually tucking your pelvis during the glute bridge and keeping your low back pressed down during the dead bug. Form slips are the usual culprit.
Add tools as needed: If your hips are especially tight, grab a foam roller or lacrosse ball. Check current prices on Amazon to find one that fits your budget. Using these tools for a few minutes before the routine can speed up progress.
Don’t get discouraged if you miss a day—just pick it up the next. The goal is to make this a reflex, not a chore. After four weeks, you can reduce to maintenance (every other day) but keep the same discipline.
Have you tried any of these exercises before? Share what worked for you in the comments below—your experience might help someone else struggling with the same issue.
Related Reading
Medical & Editorial Review: This article was reviewed by Liam Smith, founder of Apexfito, for accuracy and safety. Content is for educational purposes and is not a substitute for professional medical advice. Consult your physician before starting any exercise or nutrition program.