How to Deadlift With Perfect Form: A Beginner’s Step-by-Step Guide
Full disclosure: Some links in this article are affiliate links. We may earn a small commission at no extra cost to you if you make a purchase through them. Our recommendations are based on what real users report, not on commission size.
Before You Pull: Gear, Safety Checks, and the Starting Position
Every solid deadlift starts before the bar leaves the floor. This section covers the gear you’ll need, a quick safety check, and how to set up your stance. Get these pieces right and the actual pull becomes much easier to learn.
What You Need (and What You Don’t)
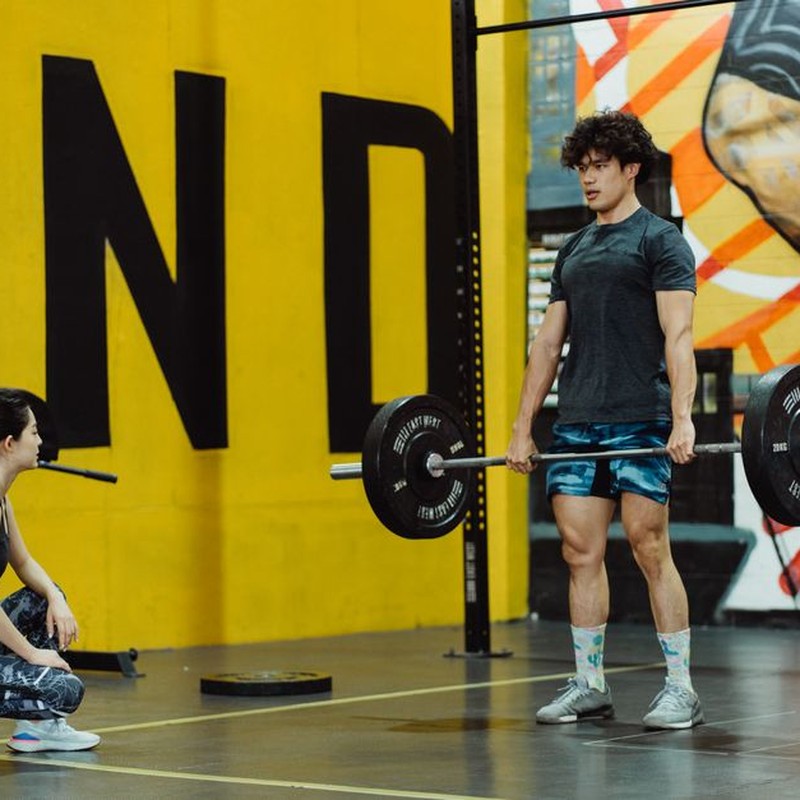
If you have access to a barbell, use one with standard 45 lb plates. Those plates are about 17.5 inches in diameter, which puts the bar at the right starting height for most people. If you load smaller plates, the bar sits lower, and you’ll have to round your back to reach it. That’s a habit you want to avoid from day one.
For footwear, flat-soled shoes or bare feet work best. Cushioned running shoes make you unstable and can pitch you forward. You don’t need special deadlift slippers to start. Just pick a flat, hard surface and stand on something that won’t compress under your weight.
Run Through These Safety Checks
- Lock the plates with collars or clips on both sides so they don’t shift during the lift.
- Confirm the bar is loaded evenly. Count the plates on each side and glance at the gap between the plates and the sleeve.
- Clear the floor around the bar. You need room to stand, pull, and step back without tripping over dumbbells or benches.
Set Up Your Stance
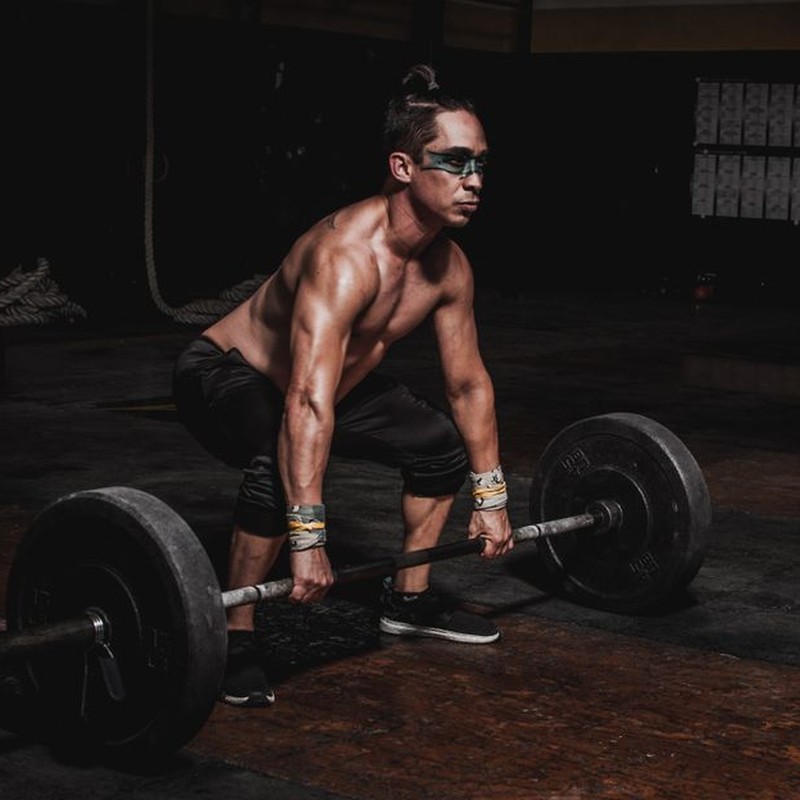
- Stand facing the bar with your feet about hip-width apart. The bar should sit directly over the middle of your foot. If you’re not sure where that is, rock slightly onto your toes and heels and feel the point where your foot balances evenly—that’s your midfoot.
- Reach down and grip the bar just outside your legs. Keep your arms long and relaxed, with your shoulders slightly in front of the bar.
- Set your neck in a neutral position. Look at a spot on the floor about 10 feet in front of you. Lift your chest and keep your spine neutral—don’t force an exaggerated curve, just avoid letting your back round into a C shape.
Take a couple of extra seconds here. I’ve watched lifters rush through the setup and then wonder why their back feels cranky after a few sets. A little patience pays off.
If You’re Brand New: Dumbbells or a Trap Bar
Before you load up a straight barbell, consider practicing the movement with light dumbbells or a trap bar (the hex-shaped bar you stand inside). Holding dumbbells at your sides teaches the hinge pattern without asking you to manage the bar around your knees. A trap bar also lets you stand inside the handles, which keeps your center of gravity stable while you learn.
Once you’re comfortable with the setup here, you’re ready to move into the pull itself. Check current prices on Amazon for lifting gear so you know what a reasonable setup costs. And if you’ve already got a deadlift setup that’s working well, share your experience in the comments.
Set Your Grip and Brace Your Core
You can have perfect hip hinge mechanics and still miss a deadlift if your arms and torso feel like cooked spaghetti. Before the bar leaves the floor, you need to lock in your grip and create enough full-body tension to make the lift feel like one connected piece. It’s not the most exciting part of the pull, but it’s the difference between a clean rep and a back injury waiting to happen.
Start with a double overhand grip, both palms facing you. For warm-up sets and lighter working weights, this is all you need. It also puts your shoulders and biceps in a safer position than a mixed grip.
Here’s what happens as the bar gets heavier: your hands will start to open before your legs are tired. That’s not a failure. It’s a normal limit. When your grip starts to fade, switch to a mixed grip (one palm facing you, one facing away) or use lifting straps. I’ve had lifters worry that straps are somehow cheating. They’re not. Straps and mixed grip are tools that let your back, hips, and legs do the work they’re trained to do. Your grip gets plenty of training on warm-ups and lighter sets.
On the bar, don’t hold it with your fingers alone. Settle the bar deep into the base of your palm, wrap your thumb around, and squeeze as hard as you can. Imagine leaving a dent in the knurling. This tight grip fires up your forearms and upper back, making your whole upper body stiffer before the pull starts.
Now add the brace. Take a deep breath into your belly, not your chest. Your stomach should push out against your belt or waistband. Brace like someone is about to punch you in the gut. This builds pressure inside your torso and helps keep your spine neutral.
Here’s the part that confuses people: you don’t exhale at the top. Hold that breath through the entire pull, through the lockout, and through the lowering. Only reset the breath once the bar is back on the floor and you’re setting up for the next rep. If you’re doing multiple reps, this means every rep gets a fresh brace. Don’t just exhale and inhale while standing up with the bar — that softens your midline and can put your lower back in a vulnerable spot.
With your grip locked and your belly braced, pull the slack out of the bar. Pull upward just enough to take the weight out of the plates. You’ll hear a small click as the bar comes taut. Keep your arms straight, pull the bar toward you, and don’t break the floor yet. Once the slack is gone, the bar feels connected to your body. From there, you drive the floor away with your legs.
Last cue: lock your lats. Push your shoulder blades down toward your back pockets, as if you’re squeezing something under your armpits. This keeps the bar from drifting forward and stops your shoulders from rolling in front of the bar. If you’ve ever watched someone deadlift and seen their upper back collapse at the start, it’s usually a missing lat brace.
Practice this setup on every single rep, even with an empty bar. Touch the bar, set your grip, breathe, brace, pull the slack, then press the floor away. Do it the same way until it feels automatic. Your back doesn’t care how much weight is on the bar — it cares that the bar starts moving from a stable, tight body.
Once you’ve tested this setup, check current prices on Amazon for a good belt or straps if you need them. And if you have a cue that helps you brace, share it in the comments.
The Pull: Leg Drive, Timing, and Lockout
Once the bar is loaded and your lats are packed, you’re in the strongest position to lift. Most beginner breakdowns happen in the next few seconds. The bar doesn’t leave the floor because you yank it. It leaves because you create upward pressure with your legs while your hips and shoulders rise together.
I’ve coached plenty of lifters who grip the bar, brace hard, and then try to muscle it up with their lower back. That usually ends with the hips shooting up and the bar swinging out in front of you. Instead, think of the first part of the deadlift as a leg press against the floor. Your arms are just hooks connected to the bar.
Set your stance, squeeze your lats, and take the slack out of the bar until you feel the plates barely click. From there, push the floor away. Do not worry about lifting the bar with your arms. Your feet drive into the platform, your knees move back, and your hips drive forward. When those two actions happen at the same time, the bar stays close and your spine stays neutral.
Here’s a timing sequence that works for most beginners:
- Push with your legs until the bar reaches your knees. Keep your chest proud and your shoulders over the bar.
- As the bar passes your knees, drive your hips forward and stand tall.
- Straighten your knees and extend your hips together, then squeeze your glutes at the top.
You might feel like the bar is going to drift away from your shins. Let it brush your legs. I have had lifters show up with chalk marks on their thighs from correctly pulling a heavy set. That is a good sign. If the bar floats forward, you’re losing tension and placing more stress on your lower back.
One common problem: the hips rise before the bar moves. That turns the deadlift into a stiff-legged pull and makes the bar swing around your knees. To fix it, lower your hips slightly at the setup and press through your midfoot. If the weight is too light, you may still feel like you are jerking it. Instead, pull the slack out first and then apply steady pressure.
At the top, finish by straightening your knees and extending your hips together. Squeeze your glutes for a second, but do not lean backward. Leaning back converts a safe lockout into a disk injury risk. Imagine being tall with your hips under your shoulders, not your shoulders behind your hips.
The first time I pulled 225 pounds, I was so focused on getting the weight up that I forgot to lock out. The bar got to my knees, my hips stalled, and I ended up rounding my back. The fix was simple: drive through my legs harder and mentally cue my hips to meet the bar. The lift happened to be a push, not a pull.
If you are using dumbbells, the same leg drive applies. Hold the dumbbells at your sides, push the floor away, and keep them close as you rise. Do not curl them. Let your hips and legs do the work.
Here is a practical drill. With your working weight or even just the bar, place a piece of tape on the floor under the middle of your foot. When you pull, focus on keeping the bar directly over that line. If it swerves forward, you’re pulling too early with your upper body.
Finally, avoid the temptation to treat the deadlift as a race. Set up, brace, press. The bar should break off the floor with smooth acceleration, not a violent jerk. A controlled pull protects your lumbar spine and sets you up for the lowering phase.
The Lowering Phase and Reset Between Reps
You can set up perfectly and pull the bar off the floor without thinking, but the rep ends when the bar is back on the ground. That is not just a formality. The way you lower the bar decides how much tension you keep in your back, how much wear you put on your joints, and how well you can pull the next rep. Most beginner lifters I have coached lose their form on the way down, and their second and third reps get messy.
There are two moments you need to separate in your mind: lowering the bar and setting up for the next rep. If you skip either one, your deadlift will feel inconsistent. Let’s walk through the lowering pattern and then the quick reset that keeps every rep clean.
Lower the Bar With Your Hips, Not Your Knees
The deadlift is a hip hinge. On the way down, you reverse the exact movement you just did. Start by pushing your hips back and letting your torso lean forward slightly. Your knees should stay in roughly the position they were in at the top until the bar clears them. If you bend your knees right away, the bar has to travel around your knees, which shifts the weight forward and can put your lower back in a vulnerable spot.
Here is the cue I use most: think about closing a car door with your butt. As your hips move back, keep your arms straight and let the bar slide down your thighs. The bar will not drop straight down like an elevator. It will move slightly back toward you as your hips sit back. That is normal, as long as your spine stays neutral.
Keep your lats tight during the lowering phase. Imagine you are holding a tennis ball in each armpit. If your shoulders round forward while the bar is falling, your spine loses support. The bar should stay in contact with your legs all the way down.
Bend Your Knees Once the Bar Clears Them
A simple rule: hips back first, knee bend second. The order matters more than the speed. Once the bar is below the top of your knees, you can gradually bend your knees and sit down a little lower to place the bar on the floor. Your shins stay vertical only until the bar passes your knees. After that, let your knees move forward naturally as you finish the descent.
If your knees shoot forward early, the bar will drift forward, and you will end up lifting with your lower back on the next rep. Practice the order at home with no weight. Stand up, push your hips back, and touch a wall behind you with your butt. Keep your knees almost straight as your torso lowers until you feel a stretch in your hamstrings. Then, and only then, bend your knees to finish the movement. After five or six reps, that sequence should feel more automatic.
Lower the Bar Under Control
Letting the bar crash to the floor is a bad idea for most gyms and most beginners. If you drop the bar from the top, you lose the eccentric part of the exercise, which is where you build strength and control along the way. You also create a lot of noise and floor impact. Even with bumper plates, dropping every rep is not something you should do as a beginner.
Lowering under control does not mean moving slowly. It means you stay connected to the bar and keep tension in your entire body. A steady one-to-two-second count works well for most reps. The bar should land softly enough that you are not getting jolted at the bottom.
The only exception is if you are using bumper plates on a proper platform designed for dropping. In that case, you might drop the bar on a heavy failed lift or during explosive pulls. For a standard deadlift workout with iron plates or rubber plates on a regular floor, let the bar down under control on every rep.
Reset Fully Between Reps
Once the bar touches the floor, let it come to a complete stop. For beginners, that means resetting every single rep. You may see lifters do touch-and-go reps, where the bar bounces off the floor without a pause. That is an advanced technique, and it is not the way to build a solid foundation. If you bounce the bar, you skip the slack-tightening and bracing that make the movement safe.
Here is the sequence I use with my clients:
- Keep your hands on the bar and let your arms stay straight. Do not let go and bend over again.
- Pause for a moment. It can be as short as one second. You are not trying to rest; you are trying to stop momentum.
- Squeeze your lats down and pull the slack out of the bar until you feel your arms tight.
- Take a fresh breath into your belly and brace your core as if you are about to be punched.
- Set your shoulders back slightly and look at a spot on the floor a few feet in front of you.
- Press your feet into the floor and start the next pull.
That whole reset can happen in two to three seconds. It might feel like a long time if you have been rushing through reps. But that pause is what makes each rep feel solid. When I first switched to a full reset, I realized how much I had been relying on the bounce. My reps felt heavier but more honest, and my back felt better by the end of the session.
What to Do If You Notice the Bar Drifting Forward
At some point, you will feel the bar swing away from your legs and your hips shoot up faster than your chest. That is usually a sign that your knees are bending too soon on the descent, or your hamstrings lost tension. When it happens, stop the set, stand up, and do two or three no-weight hip-hinge reps with the sequence above. Then come back to the bar and reset.
Another trick is to think about pushing the floor away with your feet while you lower instead of actively pulling the bar down. Your arms are just hooks. If you imagine your legs doing the work in both directions, the bar path tends to stay close to your body.
Lowering and resetting well does not take extra strength. It takes practice and a little patience. Next time you deadlift, give the floor more attention. Set the bar down with intention. Stop. Breathe. Brace. Then prove to yourself that you can hold your position for every rep, not just the first one.
Beginner Programming, Variations, and Your First Training Plan
You’ve got the setup, the brace, and the pull. Now you need a plan that lets you practice the deadlift without overcooking it. For most beginners, that means picking a weight you can move with clean technique and repeating it for several sets.
Start with 3 to 5 sets of 3 to 5 reps. If you’re not sure which end of that range to pick, begin with 5 sets of 3 at a weight that feels challenging but does not break down your form. Add about 5 to 10 lb each session, but only when every rep stays crisp. If your back rounds, the bar drifts away from your legs, or you lose your brace by the third rep, stay at that weight and work on your cues.
I’ve seen beginners get excited and jump 20 lb in a week. It doesn’t end well. The deadlift rewards patience, and the slow, steady jumps give your connective tissue time to adapt.
Your form will not improve every single week. Some weeks you’ll feel heavy and slightly off. That’s normal. If your reps start looking sloppy or your lower back feels fried, drop the weight by 10 to 15 percent for a session or two, or take a lighter week with the same number of reps. A short deload now beats a month of grinding through bad reps.
When to Use Dumbbells or a Trap Bar
If you try a barbell deadlift and your lower back rounds no matter what, switch to a dumbbell deadlift or a trap bar deadlift. These variations put your hands closer to your body and let you stay more upright, which changes the stress on your spine. Dumbbells also let you lower each rep with more control.
I’ve had clients with short arms and long torsos who simply could not reach a barbell without curving their backs. The trap bar fixed that in one session. Don’t feel like using a trap bar is cheating. It’s a tool that keeps you safe while you build strength.
Film Your Sets
You can feel a bad rep, but you can’t see it. Set your phone on a bench or table and record a set from the side. Then check your bar path, back angle, and lockout against the cues in this guide. Look for a bar path that tracks straight up and down over your midfoot, a back angle that stays constant until the bar passes your knees, and hips that lock out at the same time as your shoulders.
When I filmed my own deadlift for the first time, I realized I was yanking the bar off the floor instead of wedging into it. The video made that obvious, and I fixed it the next session.
Your First Deadlift Session
If you’re heading to the gym today, here’s a simple template:
- Warm up with 2 sets of 10 bodyweight good mornings and 1 set of 10 glute bridges. A bodyweight good morning is a hip hinge: stand tall with your hands behind your head, push your hips back, keep your spine neutral, lower your torso until you feel a hamstring stretch, then stand up by squeezing your glutes.
- Work up to a weight you can lift for 5 reps with perfect form.
- Do 4 sets of 5 with that weight, resting 2 to 3 minutes between sets.
- Record one work set from the side so you can check your bar path and back angle afterward.
- Finish with 2 sets of 8 hanging knee raises, done after your last deadlift set.
That’s not the only way to deadlift, but it’s a safe place to start. Stick with this scheme for 4 to 6 weeks before you add more volume or complexity.
Gear and Next Steps
You don’t need much equipment to deadlift, but a barbell, plates, and lifting straps can make the difference. When you’re ready to train at home, check current prices on Amazon for barbells, plates, and lifting straps. Then come back and tell us about your first deadlift session in the comments. Tell us what weight you started at and what cue finally made it click.