How to Barbell Bench Press: Complete Form Guide
How to Barbell Bench Press: Complete Form Guide
The barbell bench press is the king of chest exercises. Problem is, most people do it wrong. I’ve trained at commercial gyms for over a decade, and I’d say eight out of ten guys I see on the bench are leaving reps on the bar — or worse, setting themselves up for a shoulder injury.
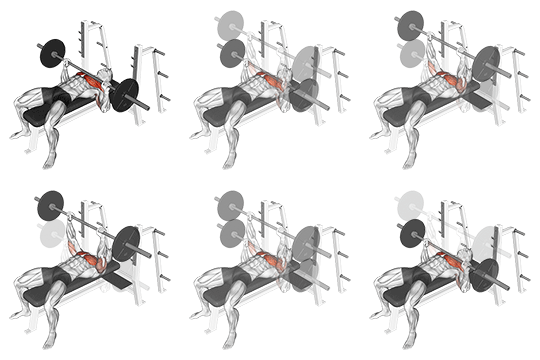
This guide walks you through every step. No fluff, just the mechanics that actually work.
Muscles Worked
The bench press is a compound movement. Here’s what’s doing the work:
- Pectoralis major (chest) — the primary target. This is the main driver of the press.
- Anterior deltoid (front shoulder) — assists during the press phase, especially at the bottom.
- Triceps brachii — takes over as your arms lock out at the top.
- Serratus anterior and rhomboids — stabilize your shoulder blades throughout the movement.
If you want to emphasize different areas, you tweak the angle or grip. More on that in the variations section.
Setup — 5 Steps to Get Right
Your setup determines everything. If you skip this part, your form falls apart before you even unrack the bar. The full bench press has 7 steps total according to the exercise standards, but the setup alone covers the first 5. Here’s how to nail each one.
Step 1: Set Your Grip
Grab the bar with your hands slightly wider than shoulder-width apart. Your thumbs should be wrapped around the bar — no suicide grip. The bar should sit in the base of your palm, not up near your fingers. For most people, the ideal grip puts your forearmsvertical to the floor at the bottom of the rep. Mark the knurling rings on the bar as your guide — ring finger on the ring is a solid starting point.
Step 2: Set Your Feet
Plant your feet flat on the floor, wider than hip-width. Drive them into the ground like you’re trying to push the floor away. Your heels should stay down throughout the entire lift. If your feet are too far forward or too narrow, your whole base collapses. Think of your legs as part of the bench press — they help you stay stable and generate power.
Step 3: Set Your Shoulder Blades
Lie back on the bench and squeeze your shoulder blades together. Pull them down toward your back pockets. Keep them pinned there for the entire set. This creates a stable platform for your shoulders and protects your rotator cuffs. I tell clients to imagine holding a walnut between their shoulder blades — don’t let it drop.
Step 4: Arch Your Upper Back (Slightly)
Create a slight arch in your upper back. Your butt stays on the bench. Your lower back should have a natural curve — you should be able to slide a hand between your lower back and the bench. This isn’t powerlifting-level arching; it’s just enough to keep your shoulders packed and your chest up. Don’t force an extreme arch if you’re not a competitive powerlifter.
Step 5: Unrack the Bar
With your shoulder blades pinned and your grip set, take a deep breath and brace your core. Push the bar up off the hooks — straight up, not forward. Move the bar over your shoulders, not over your face. Keep your elbows locked. Take another breath, brace again, and you’re ready.
Execution — The Press Itself
Steps 6 and 7 of the movement are where the magic happens.
Step 6: Lower the Bar
Inhale and lower the bar slowly to your lower chest, around the nipple line. Keep your elbows at roughly a 45-degree angle to your torso — don’t let them flare out to 90 degrees. The bar should touch your chest. Control the descent. Don’t drop it. Think about pulling the bar apart as you lower it — that cue helps keep your lats engaged and your shoulders stable.
Step 7: Press the Bar
Drive the bar back up in a slight arc toward your face. Exhale as you press. At the top, the bar should be over your shoulders, not over your neck. Lock out your elbows without hyperextending. Squeeze your chest at the top for a split second, then reset for the next rep.
That’s the full 7-step movement in its standard form. Breathe at the top, not at the bottom. One rep, one breath cycle.
Common Mistakes
Grip Too Narrow
When you bring your hands in close, you shift the load to your triceps. That’s fine if you’re doing close-grip bench intentionally, but for a standard press, a narrow grip reduces chest activation and puts more stress on your wrists and shoulders. Keep your grip wide enough that your forearms are vertical at the bottom.
Elbows Flaring
If your elbows point straight out to the sides (90 degrees from your torso), you’re putting your shoulder joint in a vulnerable position. Over time, this leads to impingement. Keep your elbows at about 45 degrees. Imagine you’re holding a loaf of bread under each armpit — don’t let the bread fall out.
Bouncing the Bar Off Your Chest
I see this constantly. People drop the bar and let it bounce off their sternum to get momentum for the press. That’s not strength; that’s physics cheating. It’s also how you crack a rib. Touch your chest, pause for a beat, then press. If you can’t do that, the weight is too heavy.
Not Touching Your Chest
Half-reps are half-results. If you stop an inch above your chest, you’re shortening the range of motion and leaving gains on the table. Unless you have a shoulder issue that prevents full range, touch your chest every rep. If you can’t touch your chest, drop the weight by 10-20% and build back up.
Variations
Incline Bench Press
Set the bench to a 30-45 degree angle. This shifts emphasis to your upper chest (clavicular head of the pectoralis major) and front delts. Form is identical to flat bench — same 7-step structure — but you’ll likely need to drop the weight by 10-15%. Keep your shoulder blades pinned; incline makes it easy to let them slide forward.
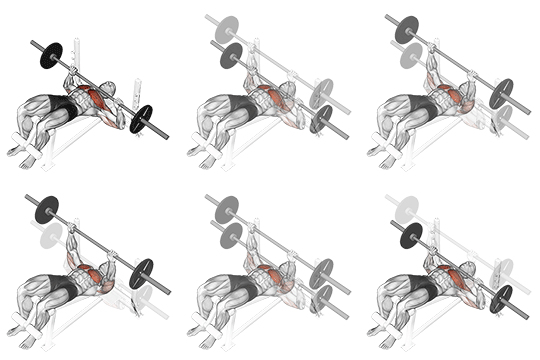
Decline Bench Press
Set the bench to a 15-30 degree decline. This targets the lower chest and can feel stronger for some lifters because your shoulders are in a more stable position. The bar touches lower on your chest, near the bottom of your sternum. Some people feel less shoulder strain with decline. If flat bench bothers your shoulders, give this a try.
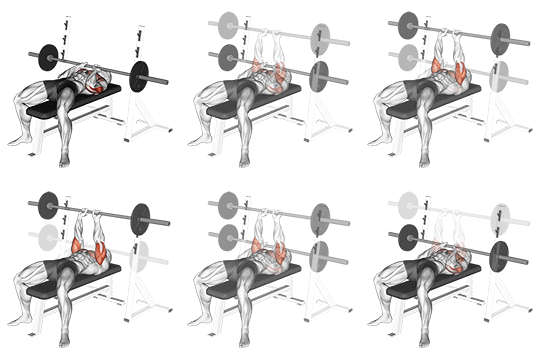
Close-Grip Bench Press
Bring your hands in to shoulder-width or closer. This shifts the load from your chest to your triceps. Keep your elbows tucked tight against your body — if your elbows flare on close-grip, your wrists take a beating. This is my go-to for triceps strength and adding lockout power to my regular bench. Lower the bar to your lower sternum, not your nipple line.
Safety Tips
- Always use clips or collars on the bar. If you dump weights off one side, the bar can whip and injure you or someone nearby.
- Bench with a spotter whenever you go heavy. A good spotter watches the bar, not your face, and knows when to help.
- Use a power rack with spotter arms if you train alone. Set the arms just below your chest range so the bar has a place to land.
- Don’t hold your breath through the whole rep. Breathe at the top. Bracing is good; passing out is not.
- Warm up your shoulders before benching. Band pull-aparts, face pulls, or light dumbbell rotations for 2-3 minutes will save your rotator cuffs.
- If it hurts, stop. Sharp shoulder pain, clicking, or grinding means something is wrong. Drop the weight, check your form, or see a physio.
Conclusion
The barbell bench press is a simple movement with a lot of room for error. Get your setup right — grip, feet, shoulder blades, arch, unrack — and the press takes care of itself. Prioritize control over ego. Touch your chest. Keep your elbows at 45 degrees. Use a spotter.
Master these 7 steps, and you’ll build a bigger, stronger chest without wrecking your shoulders. That’s the whole goal.
Medical & Editorial Review: This article was reviewed by Liam Smith, founder of Apexfito, for accuracy and safety. Content is for educational purposes and is not a substitute for professional medical advice. Consult your physician before starting any exercise or nutrition program.